BEST DEAL

Showing posts with label iphone. Show all posts

Monday, 2 January 2017

How to Jailbreak iOS 9 – iOS 9.0.2 using Pangu Jailbreak

How to Jailbreak iOS 9 – iOS 9.0.2 using Pangu Jailbreak


Pangu team just surprised us by releasing Pangu jailbreak for iOS 9 – iOS 9.0.2, the first jailbreak for iOS 9 and also for iPhone 6s, iPhone 6s Plus. Here’s how to jailbreak your device running on iOS 9, iOS 9 or iOS 9.0.2 using Pangu jailbreak.
Some important points before you proceed:
  • Pangu9 jailbreak tool can jailbreak iOS 9, iOS 9.0.1, iOS 9.0.2.
  • Pangu supports following iOS 9 – iOS 9.0.2 devices:
    • iPhone 6s, iPhone 6s Plus, iPhone 6, iPhone 6 Plus, iPhone 5s, iPhone 5c, iPhone 5, iPhone 4S
    • iPad Air 2, iPad Air, iPad 4, iPad 3, iPad 2
    • iPad mini 4, iPad mini 3, iPad mini 2, iPad mini
    • iPod touch 6G, iPod touch 5G
  • Pangu 9 is an untethered jailbreak.
  • Pangu 9 is a free jailbreak tool.
  • You need a computer (Mac or Windows PC) to use the Pangu Jailbreak. Mac users can check our guide on how to jailbreak iOS 9 – iOS 9.0.2 using Pangu Jailbreak for Windows.
  • Use iCloud or iTunes to back up any and all personal information that you need to keep safe. The jailbreak has been reported to be working in most cases, but on the off chance something goes wrong, it’s a good idea to have an escape plan.
  • Disable any Anti-virus programs or firewalls that could prevent Pangu from connecting to the internet.
  • If you’re on the fence and not sure if you should jailbreak your device, then check our post on some of the tops reasons to jailbreak iOS 9 – iOS 9.0.2.

How to Jailbreak iPhone, iPad and iPod touch on iOS 9 – iOS 9.0.2 using Pangu Jailbreak

Follow these steps to jailbreak your iPhone, iPad and iPod touch on iOS 9 – iOS 9.0.2 using Pangu jailbreak.
Step 1: Download the latest version of the Pangu jailbreak our Download Pangu Jailbreak page. Pangu jailbreak is a free jailbreak tool. It should not prompt you to enter a registration code.
Step 2: Connect your device to your computer using the USB cable.
Step 3: Take a backup of your device using the latest version of iTunes. After you’ve taken the backup, close iTunes. Also close Xcode if you’ve it open.
Step 4: Disable Passcode from Settings > Touch ID & Passcode, turn off Find my iPhone from Settings > iCloud > Find my iPhone, and enable Airplane mode.
Step 5: Please launch the Pangu 9 application that you had downloaded in step 1 as an Administrator. Right Click on the Pangu exe and select the “Run as Administrator” option.
Step 6: Pangu will take some time to detect your device. Once that is done, click on the blue Start button.
Pangu iOS 9 Jailbreak - Start
Step 7: Click on Already Backup button to proceed to the jailbreak.
Pangu iOS 9 Jailbreak - Already Backup
Step 7: At 55%, it will reboot your device.
Step 8: At 65%, it will prompt you to enable AirPlane mode again after your device has rebooted.
Step 9: At 75%, it will then prompt you to unlock your device, and run the Pangu app. Launch the Pangu app from the Home screen. If you can’t find the app the try searching your device for “Pangu”. It also installs the WWDC app but you can ignore it. The Pangu and the WWDC app will be removed when your device is successfully jailbroken.
Pangu iOS 9 Jailbreak - Run Pangu app
Step 10: Next, it will prompt you to tap on the Accept button, to give access to the Photos app. Next tap on Allow when you get a popup on your device. It is not clear why it needs access to the Photos app, we’ll update the post when we get more information.
Pangu iOS 9 Jailbreak - Access Photos
Step 11: Wait for the progress bar to complete. Your iPhone or iPad will reboot.
Step 12: Once the process completes, the Pangu tool will tell you that your device is “Already Jailbroken”. You should see the Cydia icon on your home screen. Please don’t forget to disable AirPlane mode before launching Cydia. Cydia will take some time “Preparing filesystem” when you launch it for the first time. It will exit after it is done, and respring your device.
iPhone - iOS 9 Jailbreak

How to remove the iOS 9.3.3 jailbreak from your device

How to remove the iOS 9.3.3 jailbreak from your device


Delete Cydia
The iOS 9.2-9.3.3 jailbreak debuted over the weekend, and soon after, jailbreak developers managed to make a Safari web browser-based jailbreak that doesn’t even require you to hook up to a computer to jailbreak iOS 9.3.3.
Of course, it’s a semi-untethered jailbreak, and there are a lot of caveats to it, so if you’re having jailbreaker’s remorse and you want to know how to put your device back to a stock device, don’t fret because we’re going to talk about that in this tutorial.

Removing the jailbreak from your device

Unfortunately, Cydia Impactor, which is now known as Cydia Eraser, does not support iOS 9.3.3. This means you can’t use it to remove Cydia and all traces of jailbreak from your device like you were previously able to.
If you don’t want the jailbreak that you’ve installed on your device anymore, then you will have to restore your device through iTunes. Hopefully you followed the recommended procedure before jailbreaking, and backed your device up before jailbreaking.
We know this isn’t what you wanted to hear, but this is the only way to un-jailbreak your device at this point in time.
To do this, you’ll follow these steps:
1) Plug your iPhone, iPod touch, or iPad into your Mac or PC with a Lightning cable.
2) Next, put your device into Recovery Mode. To do that, you can follow our write-up for entering Recovery Mode, and then move on to the next step.
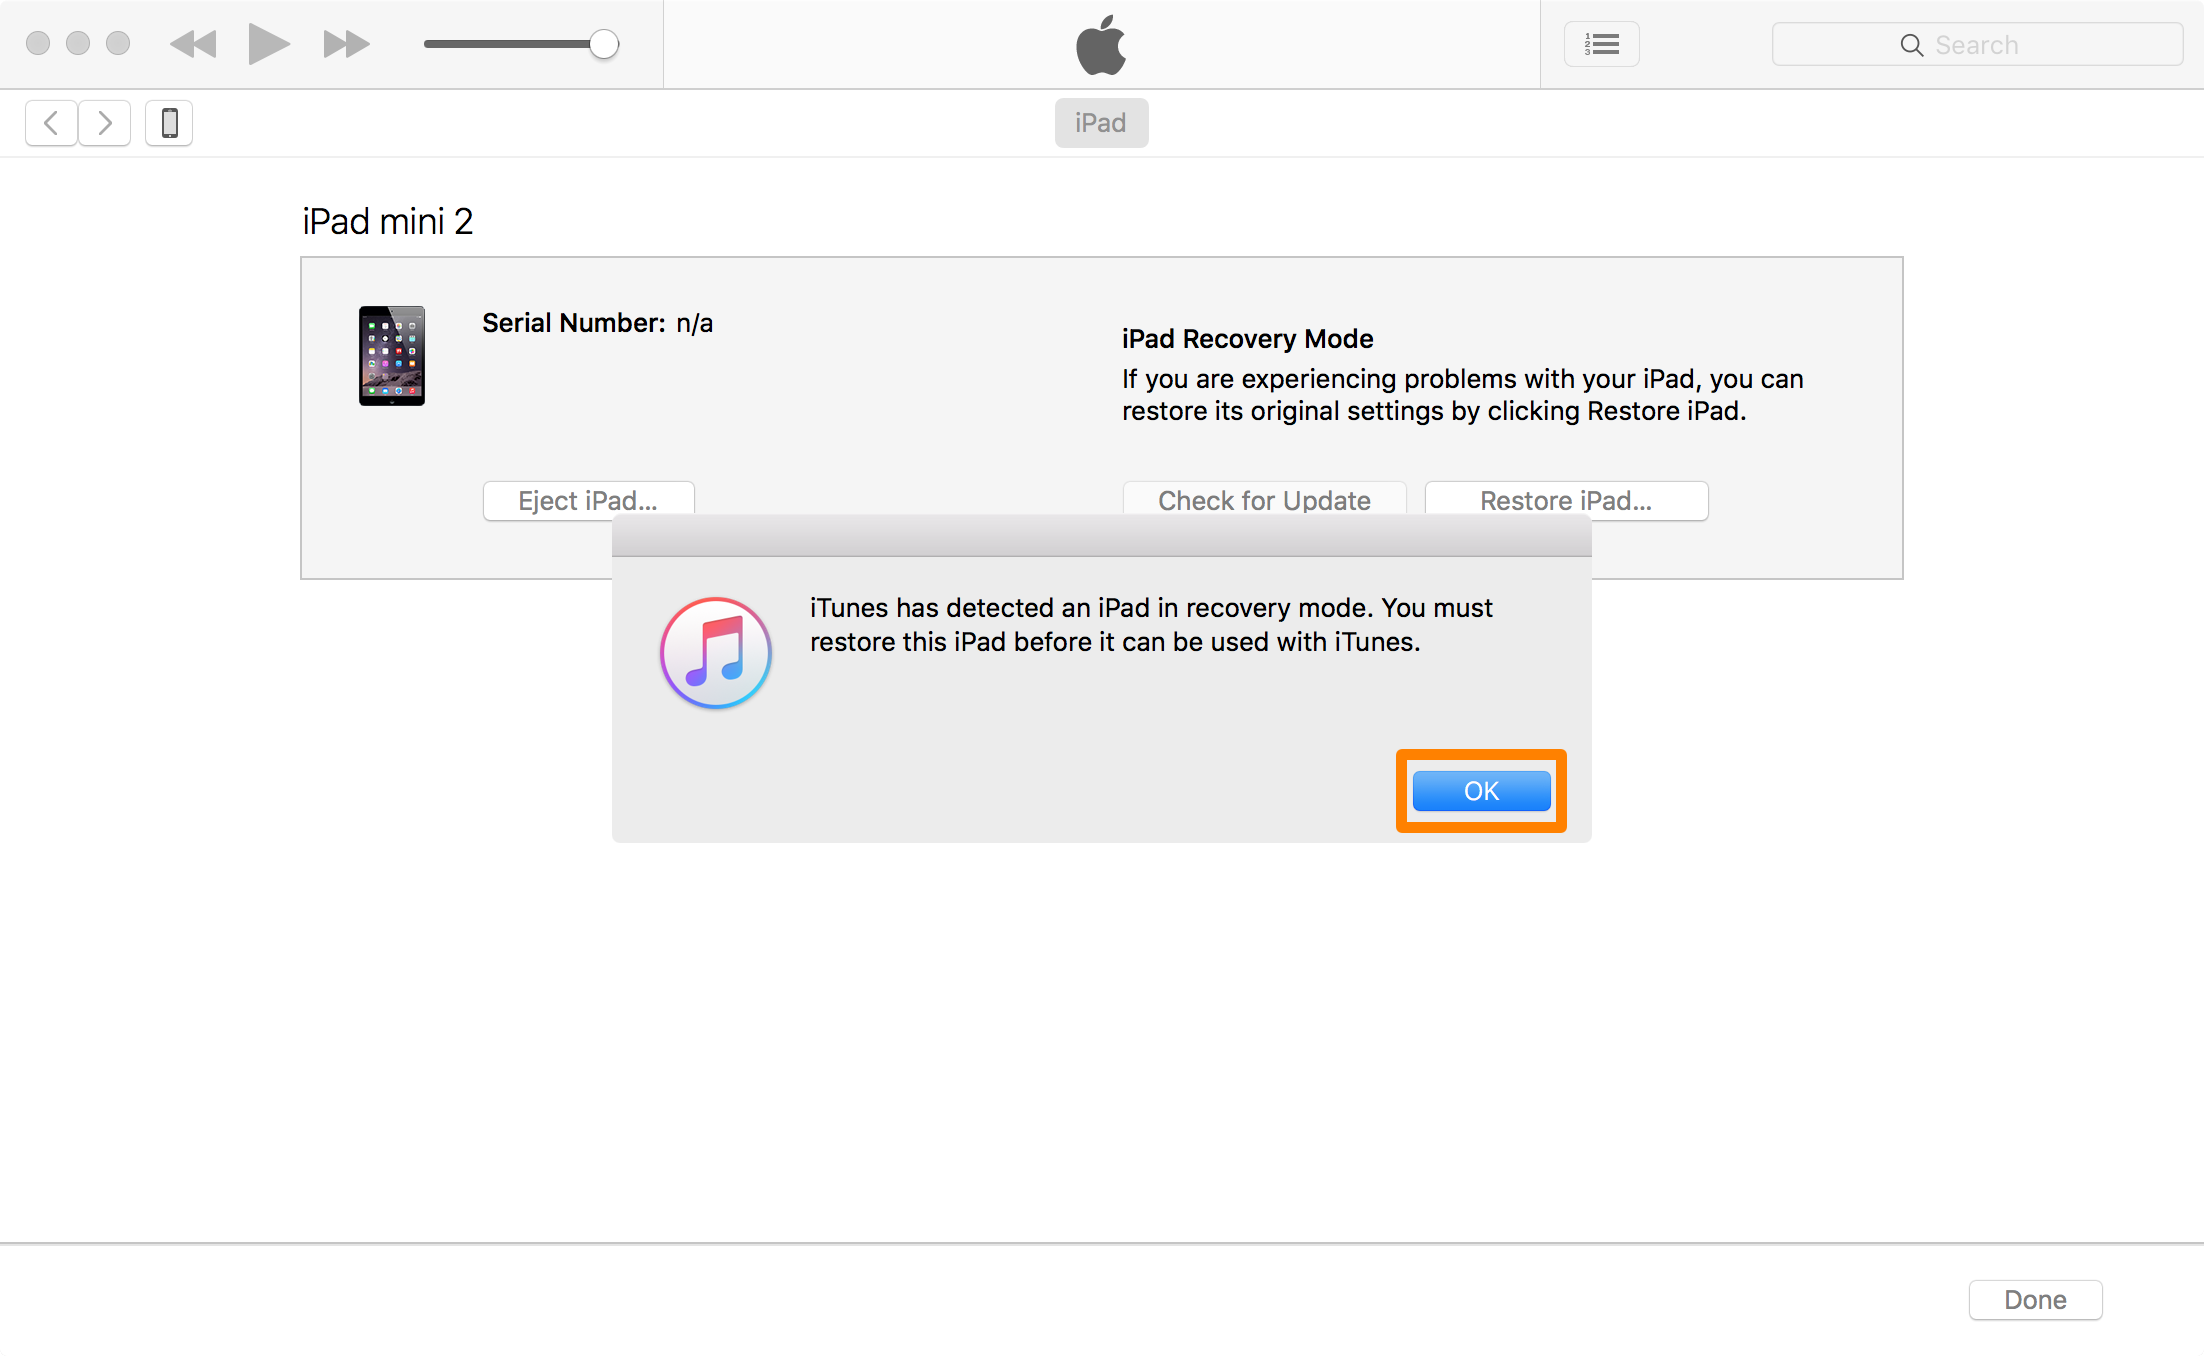
3) Launch iTunes on your Mac or PC, and you should then see a prompt from within the app. Click on the OK button.
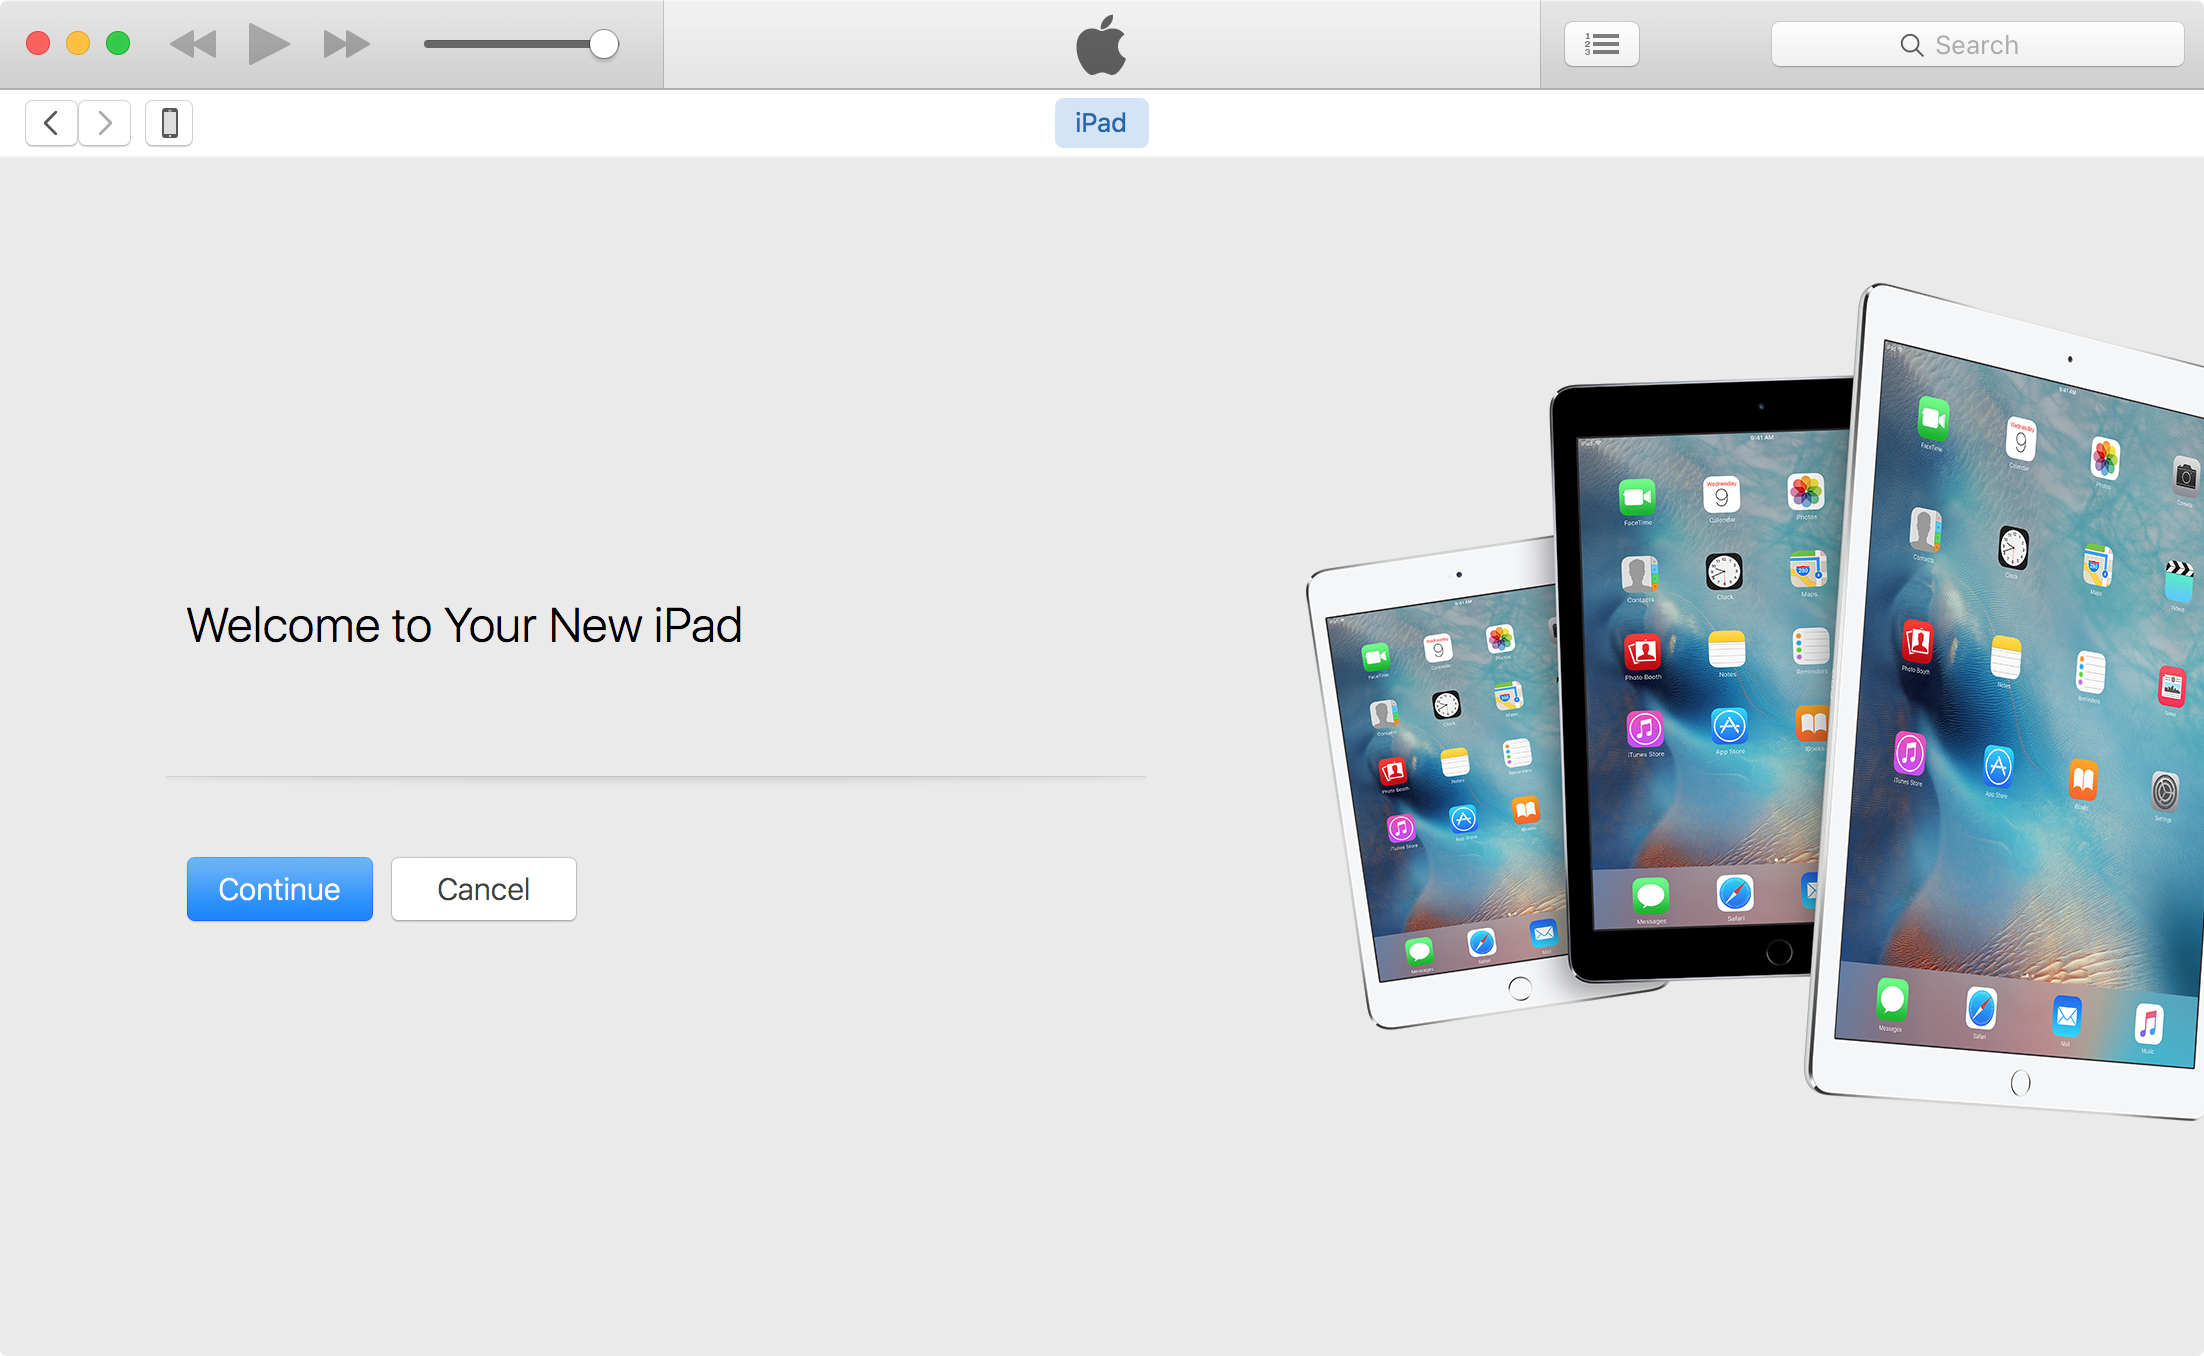
iTunes OK Restore Recovery Mode
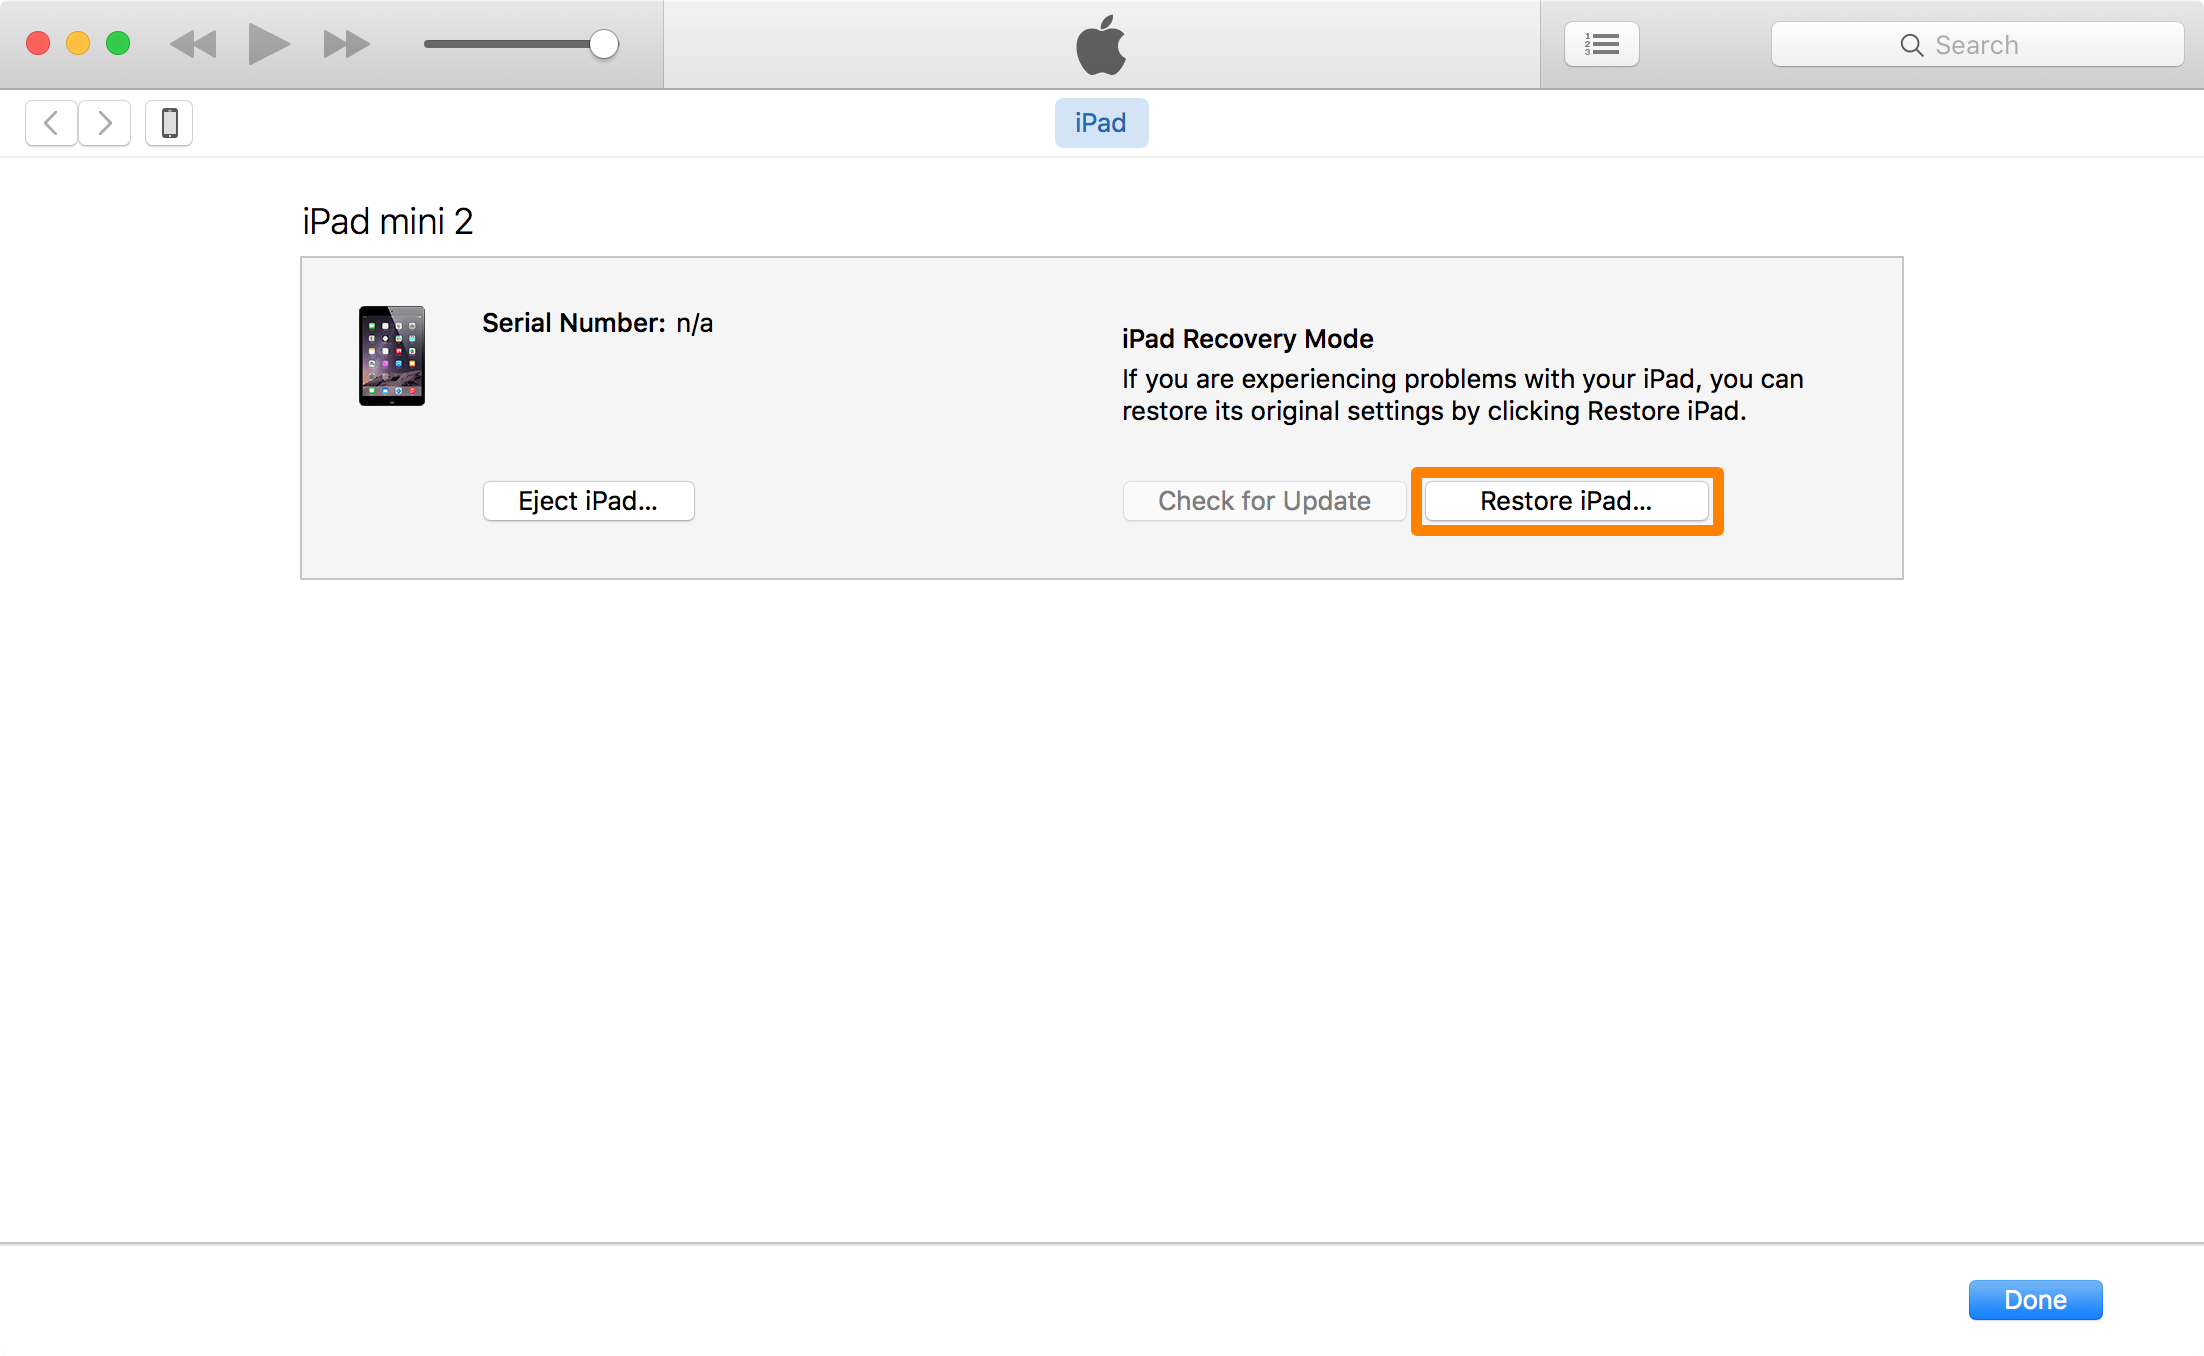
4) Next, click on the Restore button:
Restore iPad Prompt iTunes
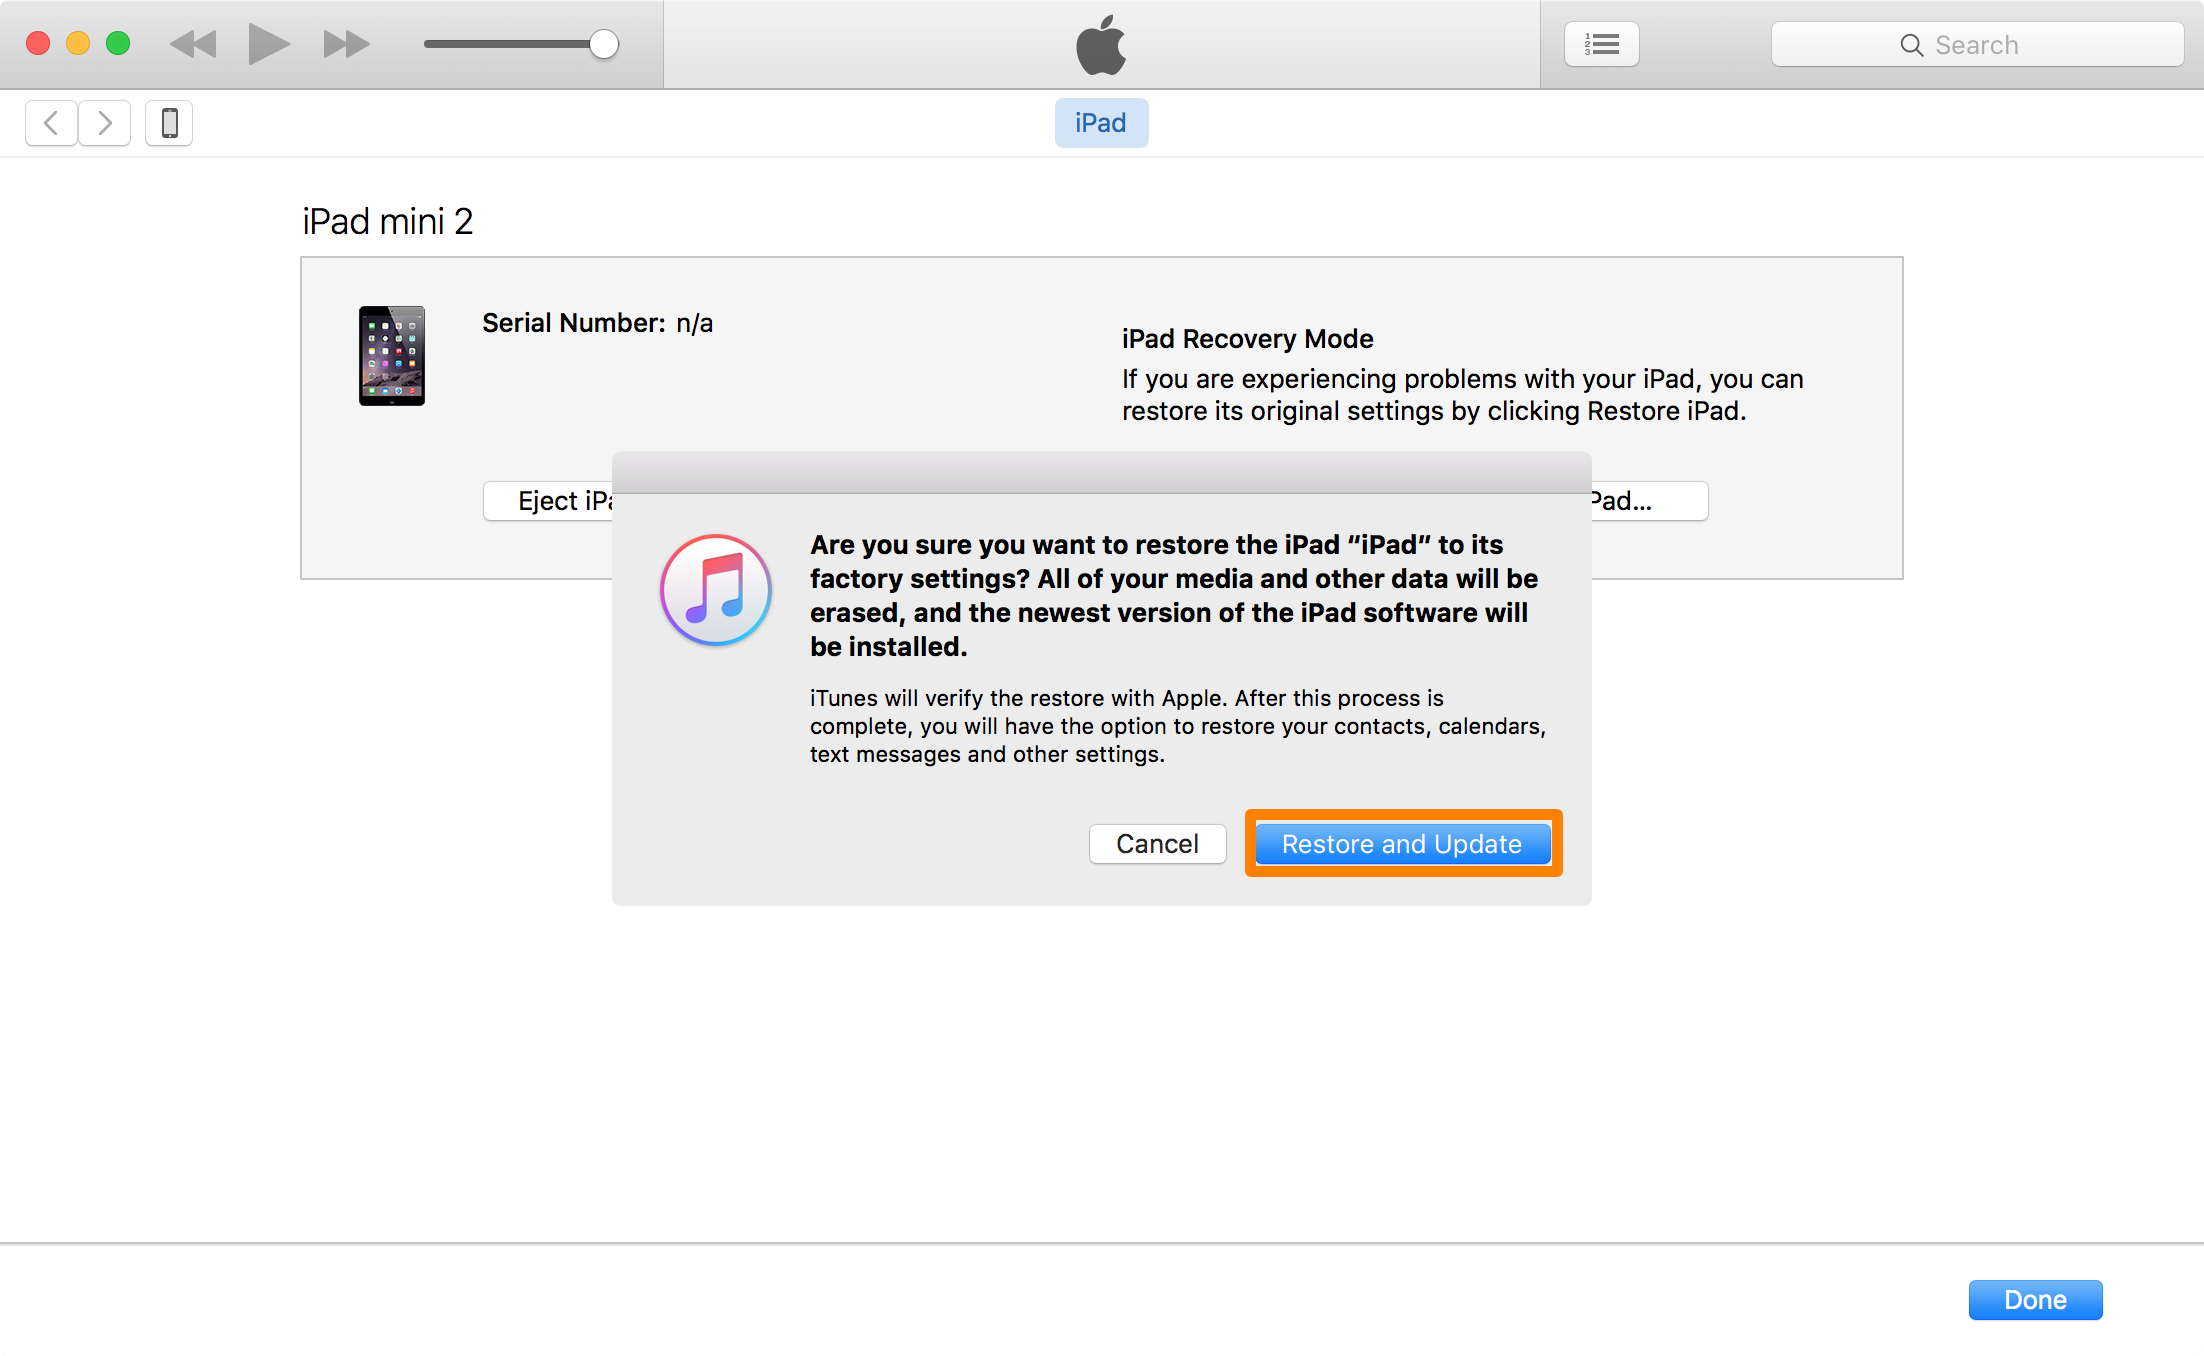
5) A prompt will now pop up, so click on the Restore and Update button.
iTunes Restore and Update
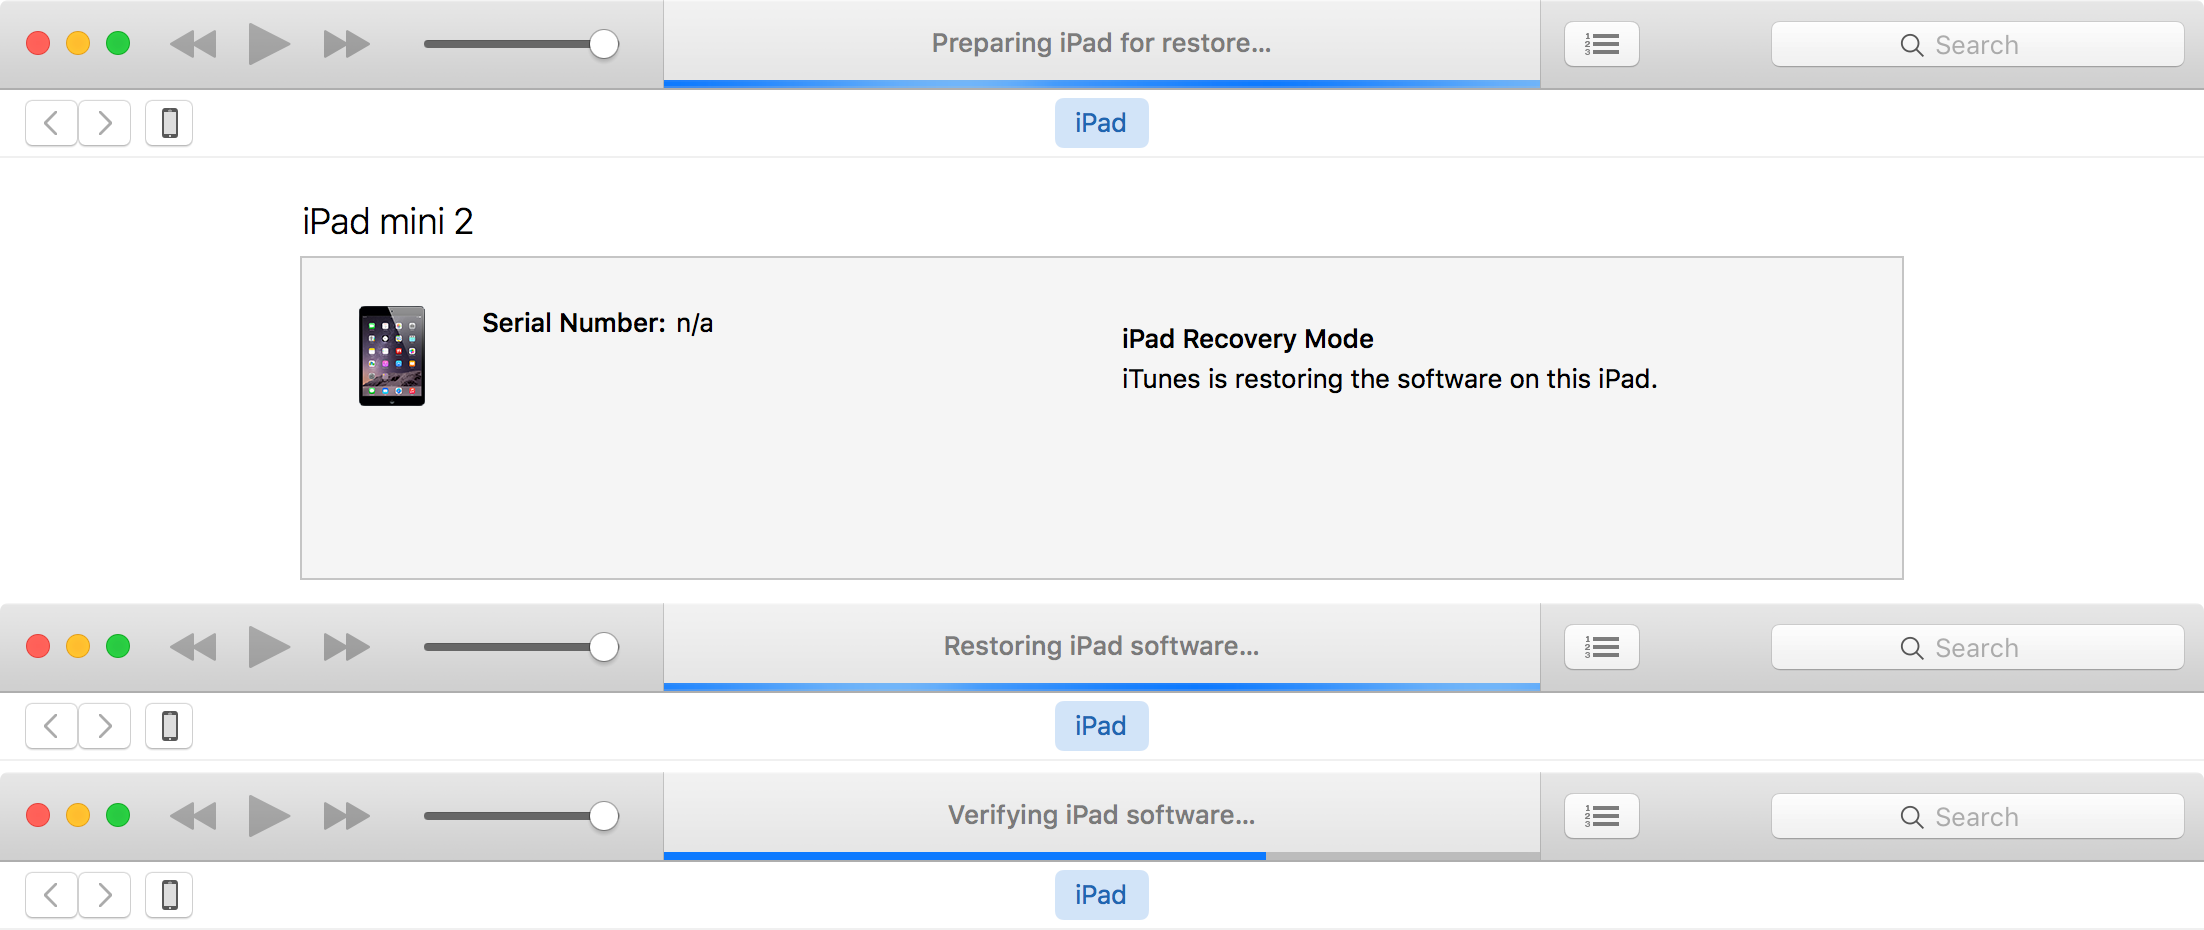
6) iTunes will now begin restoring your device. Do not disconnect it during this process:
iTunes Restore Process
7) After everything is all done, you should see this screen:
iTunes app continue restore
Congratulations! Your device is now fully restored to a stock installation of iOS. Now follow the on-screen instructions on your iOS device, and you can either set your device up as new, or you can restore from the backup that you made before the jailbreak.

Wrapping up

Unfortunately, removing your jailbreak can’t be made any easier than restoring your device at this point in time. Nevertheless, your jailbreak is now removed and your device is stock once again.

Sunday, 1 January 2017

Iphone 7S phone feattures

hi all,
Apple, Apple iPhone 7, Apple iPhone 7 review, iPhone 7 review blog, iPhone 7 review price, iPhone 7 camera samples, iPhone 7 features, iPhone 7 specs, iPhone 7 India launch, iPhone 7 India price, mobiles, smartphones, technology, technology newsApple iPhone 7 review blog: Here’s what we think of the new phone.
Apple iPhone 7 is still a couple of weeks away for most Indians. However, that hasn’t prevented at least some people from bringing in the devices from other markets where the phone has been successfully launched.
We were fortunate enough to get our hands on one of these devices and will have it with us for a couple of days. We will use the opportunity to live with the new iPhone 7 and see how much of a better experience is it offering. I am currently using the Apple iPhone 6s Plus, and will try and compare the two phones in terms of camera, speed and performance.
Apple iPhone 7 Unboxing Video
Below, see the comparison between the new iPhone 7 and last year’s iPhone 6s Plus camera. Both have 12MP rear cameras, but the iPhone 7 uses an f/1.8 aperture which gives it better performance in low light. You can see this extra light clearly in the image below.

Thursday, 22 December 2016

6 ways - why android is better than IPHONE?

Why Android is Better Than iPhone

Recently, there have been releases/announcements of the iPhone 7, iPhone 7 Plus, Galaxy Note 7, Galaxy S7/S7 Edge, Google Pixel, LG G5, HTC One (M9), and many other phones. Each release of a phone is like a single Mentos being dropped into a 2-liter of Coke -- a new explosion of debate that overwhelms the social network about who has the "best" phone. Android! No, iOS! Galaxy S7! No, iPhone 7! The debate goes on and on.
Before I get into the nitty-gritty, I want to say this. I am not an "Apple hater", and never have been. I currently own an Android phone (a Galaxy S7 Edge), I have a Windows based desktop at both work and home, I own a Macbook Pro, a Windows laptop, and I have an iPad Pro at work. I prefer to "coexist" when it comes to all the operating systems and devices out there, and I use what fits my needs as everyone should. So, before any iFans come in here looking to heckle this article, please don't. I love my Macbook Pro and the iPad I use at work. I just believe that an Android phone is better than an iPhone, and I'll state my reasons why.
*deep breath* Okay, that's done. Now, the reason why I am writing this article is because of some of the articles I have seen shared around the social media sites. For example, an article titled 5 reasons iPhone still beats Android on The Daily Dot. Perhaps you've read it already because it was shared over 273,000 times a couple years ago when I first wrote this article.
I personally believe the 5 reasons listed in the article as to why the iPhone still beats Android are pathetic at best, and don't focus on hardware at all which is, well, extremely important considering your entire phone IS hardware without taking into account what software is running on the phone. The article's 5 reasons focus on consistency, the Apple App Store, malware in the marketplace, "crapware", and home base. You can read more details about each reason in the article. All the reasons are software based or have to deal with items pertaining to how Apple does things. Not convincing at all.
Now, my turn to tell you why an Android phone is better than an iPhone:

1. Choices, choices, and more choices...

When you choose an Android phone, you have what seems like an endless amount of choices for phones. Do you want a phone that does what phones do along with taking extremely good pictures? Buy a phone whose main focus is the camera. Do you want a rugged phone that could withstand being dropped many times? Do you want a phone that has a Quad HD screen rather than the 720-1080p screen? Do you want a phone with a smaller or bigger form factor? Android phones cover all this plus so much more. That's the beauty of Android phones -- you can get the one that fits you.
With an iPhone, well, it's just an iPhone. Whatever it has in it is what you get. Sure you might get 2 or 3 options for a smaller or bigger phone that have slightly different hardware but that's it. The camera, screen, internal hardware, etc. is going to be the same on a model to model basis. For example, you can't buy an iPhone that has a high megapixel camera like Android users can with the Sony Xperia Z5.

2. Customization

My favorite part about Android phones -- customization. If you enjoy being able to customize your phone, then Android is the way to go. Don't like the standard keyboard that Android comes with? Easy! Just download a third-party keyboard app that replaces the stock one. Don't like the entire launcher that runs your phone? Download a new launcher. Want to make your phone have a layout exactly like a Windows phone? Yep, you can do that, too.
Where has this been with iOS? Well, Apple likes to keep things simple and user-friendly which is fine. Why then, with the release of iOS 8, did they copy many things that Android has had for a long time now? Predictive text on your messages, a health app, third-party keyboards, Swype texting, cloud storage for all your photos, widgets, and more. Android (thanks to Google) had all of these features long before iOS 8. After all, "imitation is the sincerest form of flattery". It's safe to say that the majority of the latest and greatest software features can be found with Android and Apple is now behind. Android wins.

3. Hardware

I believe that the hardware category really solidifies the debate between Android and Apple. People can argue all day about what software (operating system) is better for this reason or that, but you can't argue blatantly better and faster hardware.
For simplicity's sake, I am only going to focus on two phones for this category: the Apple iPhone 7 Plus and the Samsung Galaxy S7 Edge since they are the current flagship phones for both Apple and Samsung. Keep in mind the Galaxy S7 Edge was released in March of 2016, and the iPhone 7 Plus was released in September of 2016 and is therefore 6 months newer. 


As you can see from the spec comparison, the Galaxy S7 Edge still is far superior than the iPhone 7 Plus, and the iPhone 7 Plus was released 6 months after the Galaxy S7. The Galaxy S7 has been out for many months now, and the S8 will bring with it even better hardware specs. With specs such as an octa-core processor, more RAM, much more battery capacity, a higher PPI, the phone being more water-resistant, and the capability for wireless and fast charging, it should be a no-brainer that the Galaxy S7 Edge is the clear winner when it comes to hardware.
In fact, check out my phone comparisons from previous years: Apple iPhone 6 vs Samsung Galaxy S5 vs LG G3 vs HTC One (M8) spec comparison - You'll see that the iPhone 6 doesn't win a single category other than the "Dimensions/Weight" category with being 1 mm thinner and 0.45 oz lighter than the Galaxy S5.
You can also check out my latest phone spec comparison that I wrote in September of 2015: Apple iPhone 6s vs Samsung Galaxy S6 vs LG G4 vs HTC One (M9)

4. The Google Play™ Store

Android Google Play Store
The Google Play Store is fantastic. It is well laid out, extremely user-friendly, and offers about any type of app that you can think of. They just changed the layout to a very nice UI when you click on an app in the Play Store that you can see with the right-most "Instagram" picture above. It's easy to read, they show the users what they want to see, and it's visually appealing. I have used both the Google Play Store and the Apple App Store quite a bit. They're both very good app stores -- better than Amazon's App Store that's for sure.
That's not where the advantage comes in for Android, however. The advantage here is that submitting an app to the Google Play Store is much easier than going through the Apple App Store. Yes, that is because Apple goes through a tedious process of checking your app that you are submitting to make sure it follows their guidelines. This may prevent malware from being downloaded via an app, but that's not even half of it. Apple will deny your app from getting into the app store if you do something as silly as using their "chevron" symbol incorrectly. Trust me, I've seen it happen. So, no, it's not just about preventing malware... it's about making your app perfect in Apple's eyes.
On the other hand, it is much easier to submit your Android-built app to the Google Play Store. You don't have to go through half the stuff that you have to go through with Apple. This makes your life less stressful, and I like that. How many people do you actually know that have malware on their phone specifically from an app they downloaded from the app store? I don't know anyone. Besides, has common sense just flown out the window in this day and age? The Internet isn't filtered from malware, so do you go to a website that screams "THIS IS A VIRUS!"? No, it's just common sense. If there's an app that says "Hey! This is a virus, you should probably download it so I can hack you", do you download it? No. Just like if you're buying an item online, if you are debating about buying an item, do you buy the item that is rated 4.5/5 stars by 2,000 people or the item that is rated 1.5/5 stars by 700 people? Use common sense people, and bask in the glory of how easy it is to get your newly created Android app into the Google Play Store for everyone to see.

5. Widgets & Multitasking

Android Home Screen Custom Widgets
This somewhat ties in with the Customization section, but Widgets have long been a huge advantage of Android over iOS. With iOS 8, Apple finally just implemented "widgets", but they are pretty limited. You can only add them to your Notification Center. Apple opted not to have widgets available on any of your main home screens to "avoid clutter". Um, what? Having widgets on my Android home screens is one of my favorite things about Android.
Android offers all sorts of widgets that you can put onto your home screens. These widgets might be anything from a custom clock, weather, alarms, direct calls to contacts in your phone, flashlight, email, messages, and so much more. You can arrange these any which way on your home screens and have your home screens be exactly the way you want them.
Android Marshmallow Multitasking
Multitasking has also been around on Android for a while, and it's extremely easy to use. You simply open up the multitask window and you can drag two apps that you want to have going at the same time in the appropriate boxes (see the picture above). For example, I am watching a YouTube video while accessing my file system at the same. Perhaps you want to watch a lecture video while taking notes right below the video? Or, watch a video while texting your friends? Go for it. Your move, Apple.
**Note: Apple finally came out with the ability to multitask, however it is only somewhat useful on iPads, and not implemented very well. Since Android has had multitasking for so long and do it so well, they still take the cake over iOS.

6. Expandable Memory and More

The majority of Android phones offer expandable memory. That means you can pop open the back cover or a slot on the side of your phone and put in a micro SD card which then becomes added memory to your phone. What does Apple do? Well, they've never offered expandable memory for the iPhone. Instead, they would rather you pay another $100 to upgrade one of their devices from a 16 GB memory to a 32 GB or 64 GB (like an iPod for example). Are you serious? I took my Galaxy S7 Edge with 32 GB of internal memory and added another 64 GB micro SD card in it and voila! My phone now has 96 GB of capacity and how much did that cost me? $19 for the SD card. Android wins.

Friday, 16 December 2016

Iphone7 part-2 (hidden things)

#16. Increase or decrease text size

If you want to adjust the text size on your device for easier reading, then go to Settings and navigate to Display & Brightness > Text Size and adjust the slider to change the text size based on your preference. Please note that apps that support Dynamic Type will only adjust to your preferred reading size.

#17. Battery Percentage

By default, iOS displays the battery level in the top right corner of the status bar. You can keep track of the charge remaining in your iPhone more easily by enabling the battery percentage indicator, which displays the battery left in percentage. To display the battery percentage indicator, navigate to Settings > General > Usage and tap on the Battery Percentage toggle to turn it on.

#18. Close an app or multiple apps

To close or kill an app running in the background or force it to quit, double-press the Home button to access the new app switcher or multitasking tray and then swipe up on the app that you want to close. You can close multiple apps (up to 3 apps) at a time using multiple fingers.

#19. Move or delete an app on the Home screen

If you want to move the icons around on the screen, then tap and hold on the icon for a couple of seconds, and wait for all icons to wiggle. You can now drag and rearrange the icon. If you want to move the app to a different page, then you can drag it to the edge of the screen and wait for it to move across to the next page. To delete an app, tap on the little cross in the corner of the app icon to delete it. Press the Home button to stop the app icons from shaking.

#20. Do Not Disturb

Notifications and alerts ensure we don’t miss new information and events, but if you’re looking for something to silence your iPhone, whether you’re going into a meeting or going to bed, then enable the Do Not Disturb toggle in Settings. You can enable it manually by going to Settings > Do Not Disturb, and tapping on the toggle for Manualto enable it, or you can schedule it. When Do Not Disturb is enabled calls and alerts that arrive will be silenced, and a moon icon will appear in the status bar.

#21. Reachability

Reachability is a new feature introduced for iPhone 6 and iPhone 6 Plus that come with bigger screens to make it easier for one-handed use. Lightly tap twice on the Home button/Touch ID. This will slide the screen down so that you can reach UI elements in the top half more easily with your thumb. It stays in that position for 5-6 seconds giving you enough time to interact. When the screen pans down, it only stays down for one tap.

#22. Control Center

Control Center gives you quick access to the Camera, Calculator, AirPlay and music controls. It also gives you the ability to adjust the brightness, enable or disable system toggles such as AirPlane mode, Wi-Fi, Bluetooth, Do Not Disturb and Portrait Location Lock. To access Control Center, swipe up from the bottom edge of the screen.

#23. Flashlight

You can use your iPhone as a flashlight. Just swipe up from the bottom edge of the screen to access the Control Center, and tap on the torch icon to enable the flashlight.

#24. Apple ID without credit card

In case you’re not aware, you can create an Apple ID without a credit card so that you can use it to download free apps. Some parents create such accounts and top it up with iTunes gift card to control the spending on the App Store by their children.

Keyboard Tips

#25. Add An International Keyboard

If you need to communicate with your colleagues and family in different languages, the iPhone offers a one-tap solution to toggle between the different keyboards. To add an international keyboard, launch the Settings app and navigate to General -> Keyboard -> Keyboards > Add New Keyboard to add a new language to your active keyboards list. Once done, you simply have to tap on the globe icon beside the space bar on the keyboard to switch to another language.

#26. Add Special Symbol

Can’t find the € symbol on your iPhone or iPad’s keyboard? To insert this symbol, you simply have to tap and hold the $ key. You will be shown a list of alternate currency symbols, including  €, to pick from. You can use the same trick to insert many other symbols like an inverted exclamation, longer hyphens,etc by tapping and holding the corresponding keys.

#27. Quick Way To Start A New Sentence

The iOS keyboard lets you add a period and start a new sentence by simply double-tapping the space bar. This trick is particularly useful while you type long paragraphs of text. To make sure this feature is enabled, go to Settings -> General -> Keyboard and check if  the toggle for “.” Shortcut is enabled.

#28. Quickly Insert Punctuation

Many users tend to tap on the “123” key to view the list of numbers and symbols to pick. Once done, they tap on the “ABC” key to revert back to the alphabet keyboard to continue typing. You can do this a lot more quickly by tapping and holding the “123” key, and swiping on the keyboard to the punctuation mark you need in one single swipe action. Once you select the punctuation or symbol you want to add, release your finger, iOS will automatically revert back to the alphabet keyboard. So this saves you the hassle of switching between keyboards.

#29. Quickly type capital letters

If you’re in the middle of a sentence and want to type a single capital letter, you’d normally enable the cap lock key, type the letter and disable it again. But there’s a much simpler way: Tap on the Shift key and in one single action slide your finger to the key you want to type. When you release it, you’ll see that the Shift key is disabled again, saving you an extra tap.

#30. Quickly Change Domain Name Extension

The Mobile Safari browser comes with a handy .com key for users to easily suffix the domain name extension to the URL in the address bar. You can also use this key to add other extensions like .ORG or .NET. To do this, tap and hold the .COM key to view the alternate extensions to pick from. Interestingly, this list will also include specific country-code extensions if you have the corresponding languages added to your International keyboard list.

#31. Shake to Undo

Instead of holding the delete key to remove the typed text, you may simply shake the iPhone (once to your left and back). This will prompt you with an option to ‘Undo Typing‘. Tapping this button will automatically delete your recently typed text.

#34. Type smart quotes

The default quote key on the keyboard includes normal quotes, often called “dumb” quotes. But you can type in the curved variants of quotation marks (called smart quotes) by long pressing the quote key.

IPHONE7 &7S Cool feature - that you dont know (TOP 7)

#1. Customize How The Home Button Feels

The new Home button isn’t actually a button. Similar to the Force Touch trackpad on the new Macs, the new Home “button” is capacitive. It doesn’t move itself, you get feedback on the operation thanks to the Taptic engine just behind the Home button.
This means that you can customize how “hard” the press/feedback feels like. There are 3 settings – basically low, medium and high. You would be asked about it during setup. But you can go into “Settings” -> “General” -> “Home” to change them anytime.

#2. Learn The New Way To Hard Reset

If your iPhone was acting weirdly, the first thing you’d do is hard reset. Just press and hold the Sleep/Wake and Home button until the iPhone reboots. But because the Home button isn’t a real button now, the key combination for this action has changed. You now need to press and hold “Sleep/Wake” and “Volume Down” buttons.

#3. Switch to Portrait Mode

If you’re running iOS 10.1 and up on your iPhone 7 Plus, you should now see a new option for the Portrait mode. You can switch to it by swiping on the camera view, the same way you switch to Pano mode.

#4. Don’t Save Two Copies Of Portrait Mode Photo

When you click a Portrait shot, iOS saves a normal version of the photo, in case you don’t like the Portrait mode photo. But this means you’re using up double space. If you’re pretty confident about Portrait mode’s prowess, you can go into “Settings” -> “Photo & Camera” and disable “Keep Normal Photo” from under the Portrait Mode section.

#5. Use Optical Zoom on iPhone 7 Plus

iPhone 7 optical zoom
You should know that on your iPhone 7 Plus, you actually have 2x optical zoom thanks to the secondary telephoto lens at the back. To activate it, all you have to do is tap on the “2x” button above the shutter key. You can also swipe around to go from 1x to 10x, for finer control. Anything above 2x is software zoom.

#6. Switch to 4K Recording

While it’s not turned on by default, you should know that your iPhone has the ability to shoot videos in 4K. If you’re shooting something at a party, in good light, try switching to 4K. It will take up a lot of memory but the footage will look amazing. From the Settings app, go to “Photo and Camera“. From “Record Video” option, switch to “4k at 30 fps“.

#7. Lock Camera Lens When Recording

Now that the iPhone 7 Plus has a zoom lens, there’s a new setting available to lock the lens when recording a video. This means the zoom won’t readjust itself every time there’s a flickering image or a light issue. You’ll find the “Lock Camera Lens” option in the same “Record Video” section.

#8. Turn off Raise to Wake

ios 10 settings raise to wake
iOS 10 running on the iPhone 7 has a new feature where it automatically lights up the display when you pick up the phone. But if you keep doing this accidentally, there’s a way to turn the feature off from “Settings” -> “Display and Brightness“.

#9. Add Widgets To Lock screen

ios-10-2-videos-widget
Widgets on iOS 10 are actually quite epic. Really useful. And you can add them directly to the Lock screen. The left page is dedicated to them. Swipe right on the Lock screen, swipe to the bottom and tap “Edit” to customize widgets. Check out our guide here.

#10. Use Your iPhone as a Magnifier

ios 10 settings magnifier
You can use iPhone’s epic camera as your personal magnifier, zooming way in to read things you can’t with your naked eye. To enable this feature, go into “Settings” -> “General” -> “Accessibility” -> “Magnifier” and turn it on. Next time you want to use this feature, triple click the Home button and it will show up.

#11. Charge The iPhone And Listen To Music

belkin-lighning
The iPhone has no headphone jack. So if you want to listen to music using the Lighting EarPods while your iPhone is being charged, you’ll need – a dongle. Belkin makes a dongle with 2 Lightning ports, called “Belkin Lightning Audio + Charge RockStar” and it sells for $40. You can also buy Bluetooth earphones. Or Apple’s AirPods, when they come out.

#12. Use 3D Touch


In iOS 10, 3D Touch is available a lot lot more places. And it is now essential if you want to reply to comments from the Lock screen, or send effects in Messages app. You should start using 3D Touch, and incorporate it in your day to day use. Check out our list on all the new places 3D Touch is available in iOS 10.

#13. Unlock iPhone Without Pressing The Home Button

iOS 10 requires you to “press” the Home button to unlock the iPhone. Even on iPhone 7, this means pressing the Home button till you get the Taptic feedback. But what if you want to unlock your iPhone as soon as you put your finger on the Home button. You can do that, as long as the screen is awake, using an Accessibility setting.
From the Settings app, go to “General” -> “Accessibility” -> “Home. And turn on “Rest Finger to Unlock” option.

#14. Disable New System Haptics

The iPhone 7 has a really powerful Taptic engine. And in iOS 10, there’s haptic feedback almost everywhere. This is created to simulate real world. So when you’re spinning the date wheel, you’ll feel like it’s moving. This is also available in apps like Mail when deleting emails, for example.
But this might be annoying to some, so go into Settings and find the all new “Sounds & Haptics” section. From the bottom, turn off the “System Haptics” option.

General

#15. Enable Two-Step Verification

You will use the Apple ID for everything to do with Apple such as shop on the iTunes Store, enable iCloud on all our devices, buy from Apple’s Online Store and lots more, so it is highly recommended that you enable two-step verification for your Apple ID to increase the security of your account, to prevent you account from getting hacked.