BEST DEAL

Showing posts with label yahoo. Show all posts

Monday, 2 January 2017

How to Jailbreak iOS 9 – iOS 9.0.2 using Pangu Jailbreak

How to Jailbreak iOS 9 – iOS 9.0.2 using Pangu Jailbreak


Pangu team just surprised us by releasing Pangu jailbreak for iOS 9 – iOS 9.0.2, the first jailbreak for iOS 9 and also for iPhone 6s, iPhone 6s Plus. Here’s how to jailbreak your device running on iOS 9, iOS 9 or iOS 9.0.2 using Pangu jailbreak.
Some important points before you proceed:
  • Pangu9 jailbreak tool can jailbreak iOS 9, iOS 9.0.1, iOS 9.0.2.
  • Pangu supports following iOS 9 – iOS 9.0.2 devices:
    • iPhone 6s, iPhone 6s Plus, iPhone 6, iPhone 6 Plus, iPhone 5s, iPhone 5c, iPhone 5, iPhone 4S
    • iPad Air 2, iPad Air, iPad 4, iPad 3, iPad 2
    • iPad mini 4, iPad mini 3, iPad mini 2, iPad mini
    • iPod touch 6G, iPod touch 5G
  • Pangu 9 is an untethered jailbreak.
  • Pangu 9 is a free jailbreak tool.
  • You need a computer (Mac or Windows PC) to use the Pangu Jailbreak. Mac users can check our guide on how to jailbreak iOS 9 – iOS 9.0.2 using Pangu Jailbreak for Windows.
  • Use iCloud or iTunes to back up any and all personal information that you need to keep safe. The jailbreak has been reported to be working in most cases, but on the off chance something goes wrong, it’s a good idea to have an escape plan.
  • Disable any Anti-virus programs or firewalls that could prevent Pangu from connecting to the internet.
  • If you’re on the fence and not sure if you should jailbreak your device, then check our post on some of the tops reasons to jailbreak iOS 9 – iOS 9.0.2.

How to Jailbreak iPhone, iPad and iPod touch on iOS 9 – iOS 9.0.2 using Pangu Jailbreak

Follow these steps to jailbreak your iPhone, iPad and iPod touch on iOS 9 – iOS 9.0.2 using Pangu jailbreak.
Step 1: Download the latest version of the Pangu jailbreak our Download Pangu Jailbreak page. Pangu jailbreak is a free jailbreak tool. It should not prompt you to enter a registration code.
Step 2: Connect your device to your computer using the USB cable.
Step 3: Take a backup of your device using the latest version of iTunes. After you’ve taken the backup, close iTunes. Also close Xcode if you’ve it open.
Step 4: Disable Passcode from Settings > Touch ID & Passcode, turn off Find my iPhone from Settings > iCloud > Find my iPhone, and enable Airplane mode.
Step 5: Please launch the Pangu 9 application that you had downloaded in step 1 as an Administrator. Right Click on the Pangu exe and select the “Run as Administrator” option.
Step 6: Pangu will take some time to detect your device. Once that is done, click on the blue Start button.
Pangu iOS 9 Jailbreak - Start
Step 7: Click on Already Backup button to proceed to the jailbreak.
Pangu iOS 9 Jailbreak - Already Backup
Step 7: At 55%, it will reboot your device.
Step 8: At 65%, it will prompt you to enable AirPlane mode again after your device has rebooted.
Step 9: At 75%, it will then prompt you to unlock your device, and run the Pangu app. Launch the Pangu app from the Home screen. If you can’t find the app the try searching your device for “Pangu”. It also installs the WWDC app but you can ignore it. The Pangu and the WWDC app will be removed when your device is successfully jailbroken.
Pangu iOS 9 Jailbreak - Run Pangu app
Step 10: Next, it will prompt you to tap on the Accept button, to give access to the Photos app. Next tap on Allow when you get a popup on your device. It is not clear why it needs access to the Photos app, we’ll update the post when we get more information.
Pangu iOS 9 Jailbreak - Access Photos
Step 11: Wait for the progress bar to complete. Your iPhone or iPad will reboot.
Step 12: Once the process completes, the Pangu tool will tell you that your device is “Already Jailbroken”. You should see the Cydia icon on your home screen. Please don’t forget to disable AirPlane mode before launching Cydia. Cydia will take some time “Preparing filesystem” when you launch it for the first time. It will exit after it is done, and respring your device.
iPhone - iOS 9 Jailbreak

How to remove the iOS 9.3.3 jailbreak from your device

How to remove the iOS 9.3.3 jailbreak from your device


Delete Cydia
The iOS 9.2-9.3.3 jailbreak debuted over the weekend, and soon after, jailbreak developers managed to make a Safari web browser-based jailbreak that doesn’t even require you to hook up to a computer to jailbreak iOS 9.3.3.
Of course, it’s a semi-untethered jailbreak, and there are a lot of caveats to it, so if you’re having jailbreaker’s remorse and you want to know how to put your device back to a stock device, don’t fret because we’re going to talk about that in this tutorial.

Removing the jailbreak from your device

Unfortunately, Cydia Impactor, which is now known as Cydia Eraser, does not support iOS 9.3.3. This means you can’t use it to remove Cydia and all traces of jailbreak from your device like you were previously able to.
If you don’t want the jailbreak that you’ve installed on your device anymore, then you will have to restore your device through iTunes. Hopefully you followed the recommended procedure before jailbreaking, and backed your device up before jailbreaking.
We know this isn’t what you wanted to hear, but this is the only way to un-jailbreak your device at this point in time.
To do this, you’ll follow these steps:
1) Plug your iPhone, iPod touch, or iPad into your Mac or PC with a Lightning cable.
2) Next, put your device into Recovery Mode. To do that, you can follow our write-up for entering Recovery Mode, and then move on to the next step.
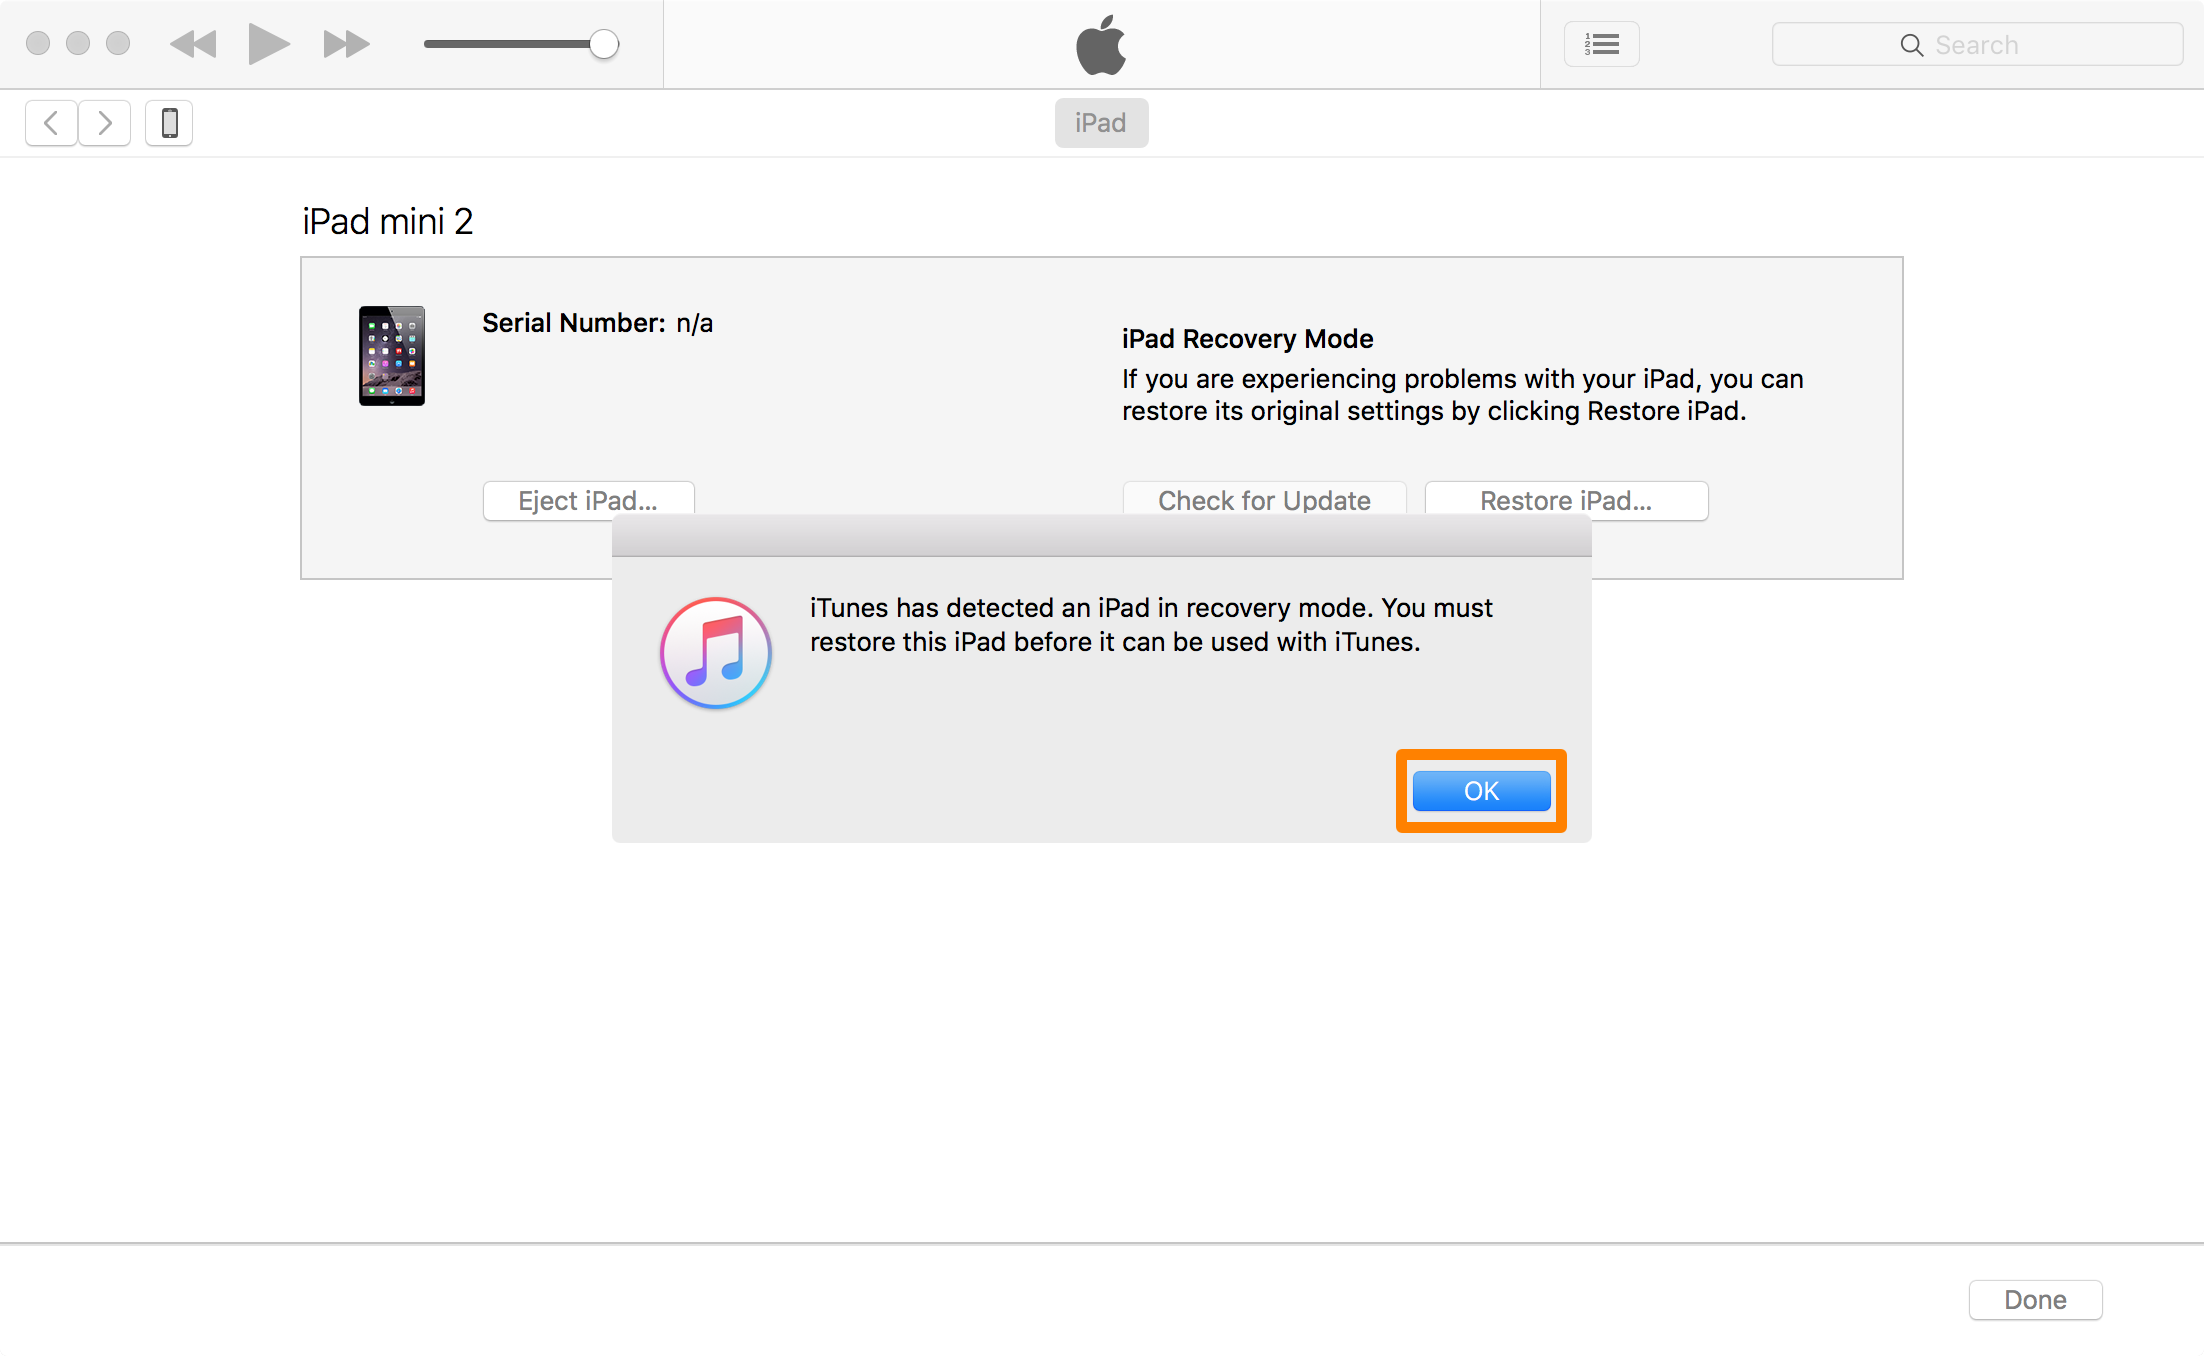
3) Launch iTunes on your Mac or PC, and you should then see a prompt from within the app. Click on the OK button.
iTunes OK Restore Recovery Mode
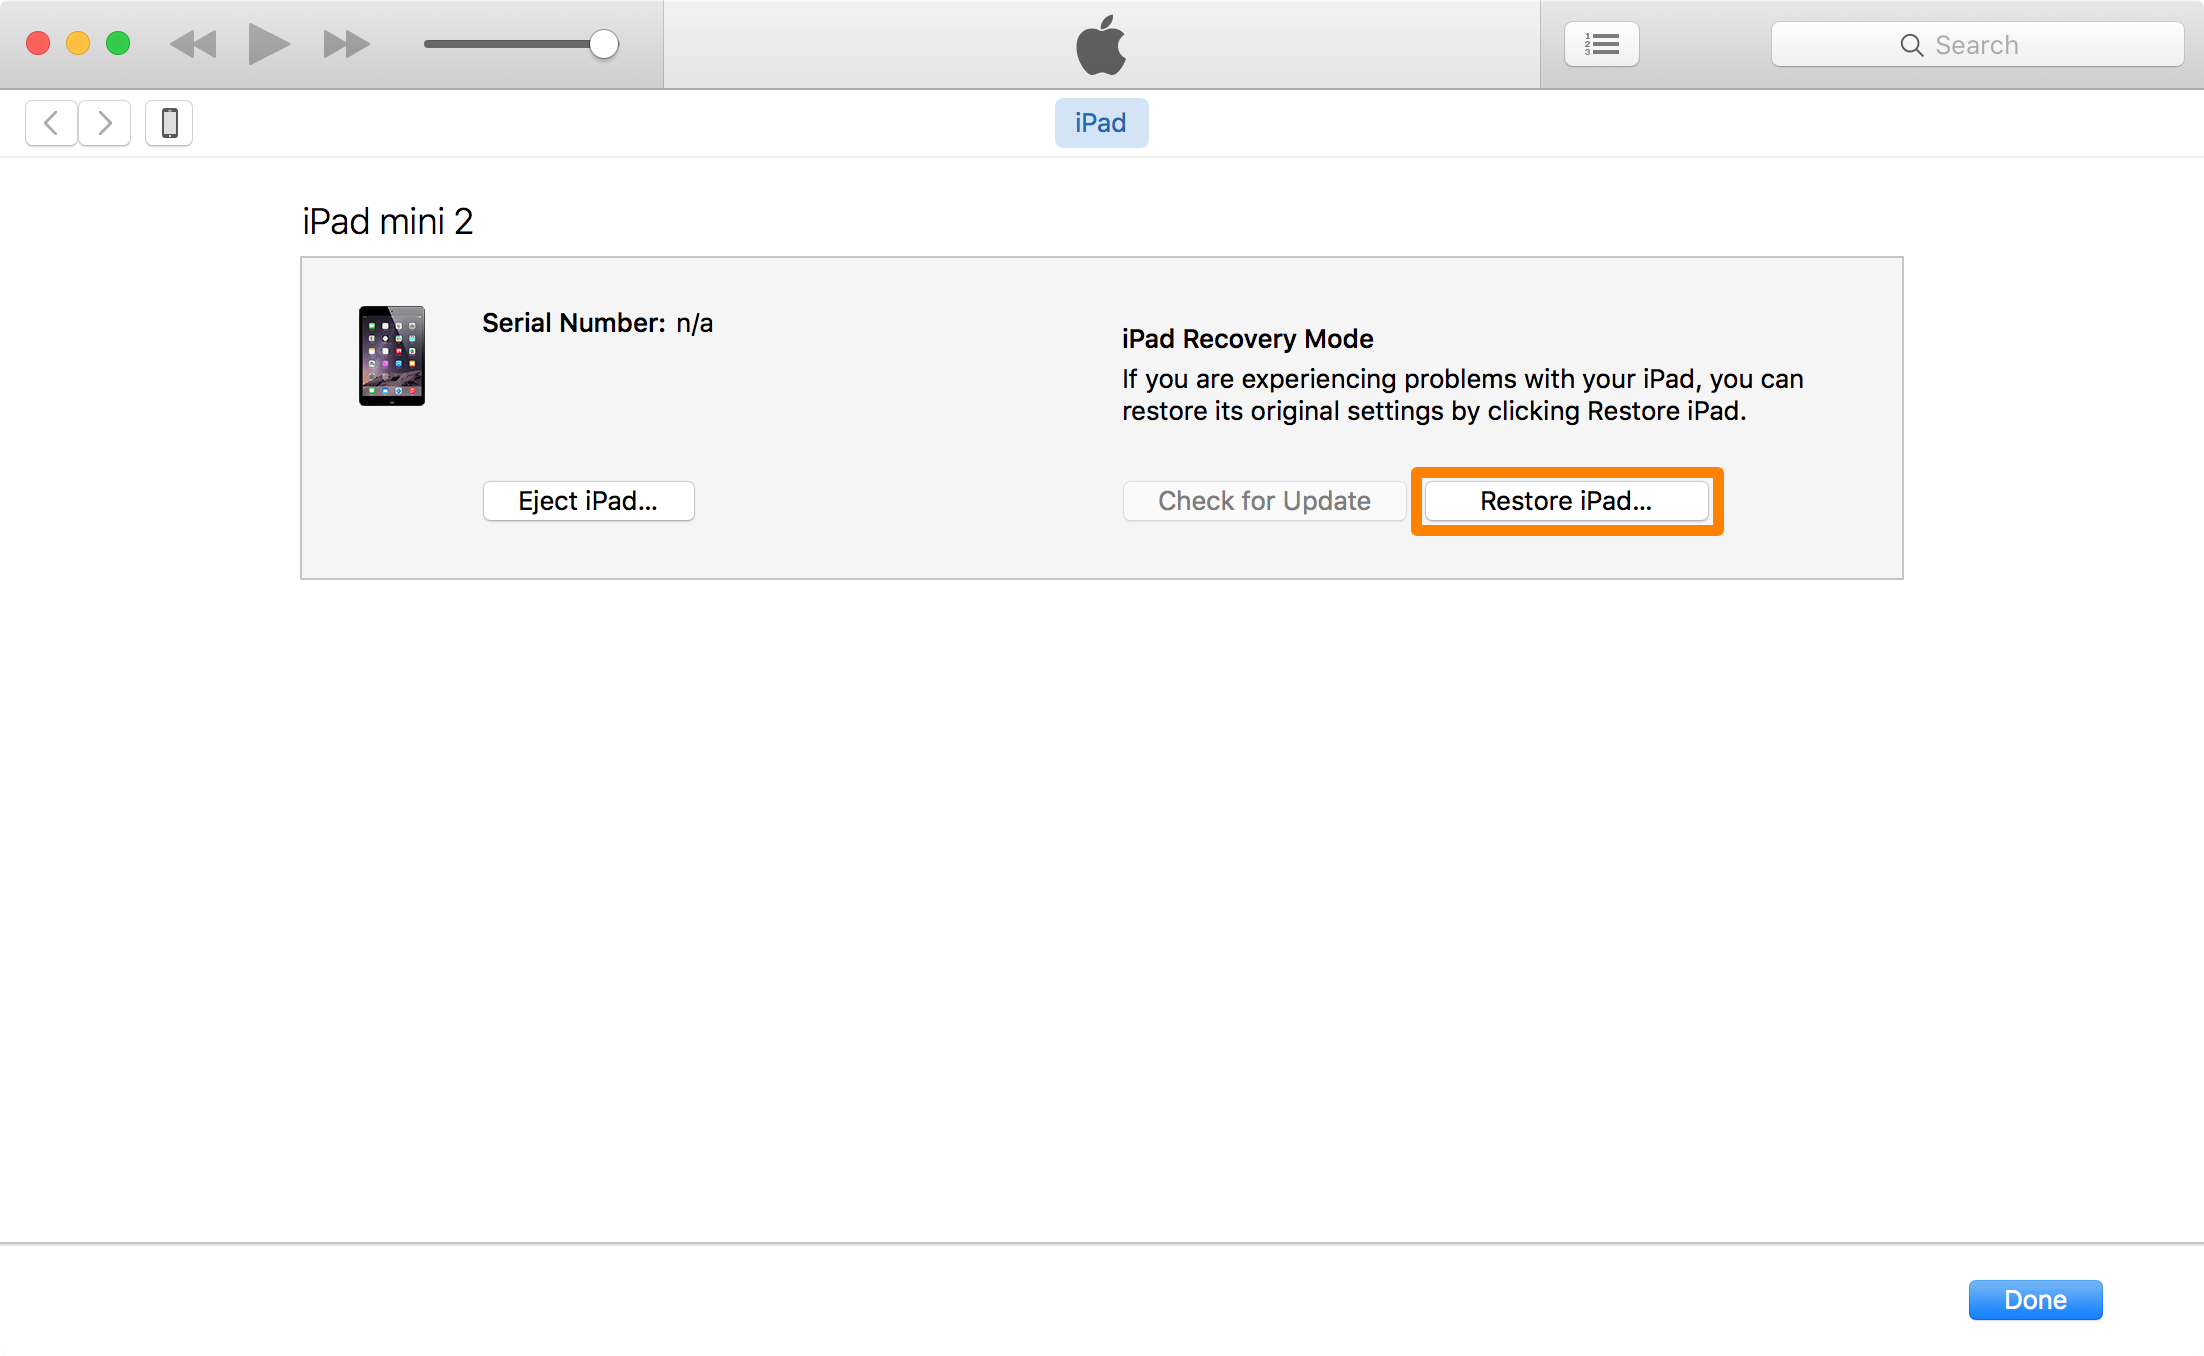
4) Next, click on the Restore button:
Restore iPad Prompt iTunes
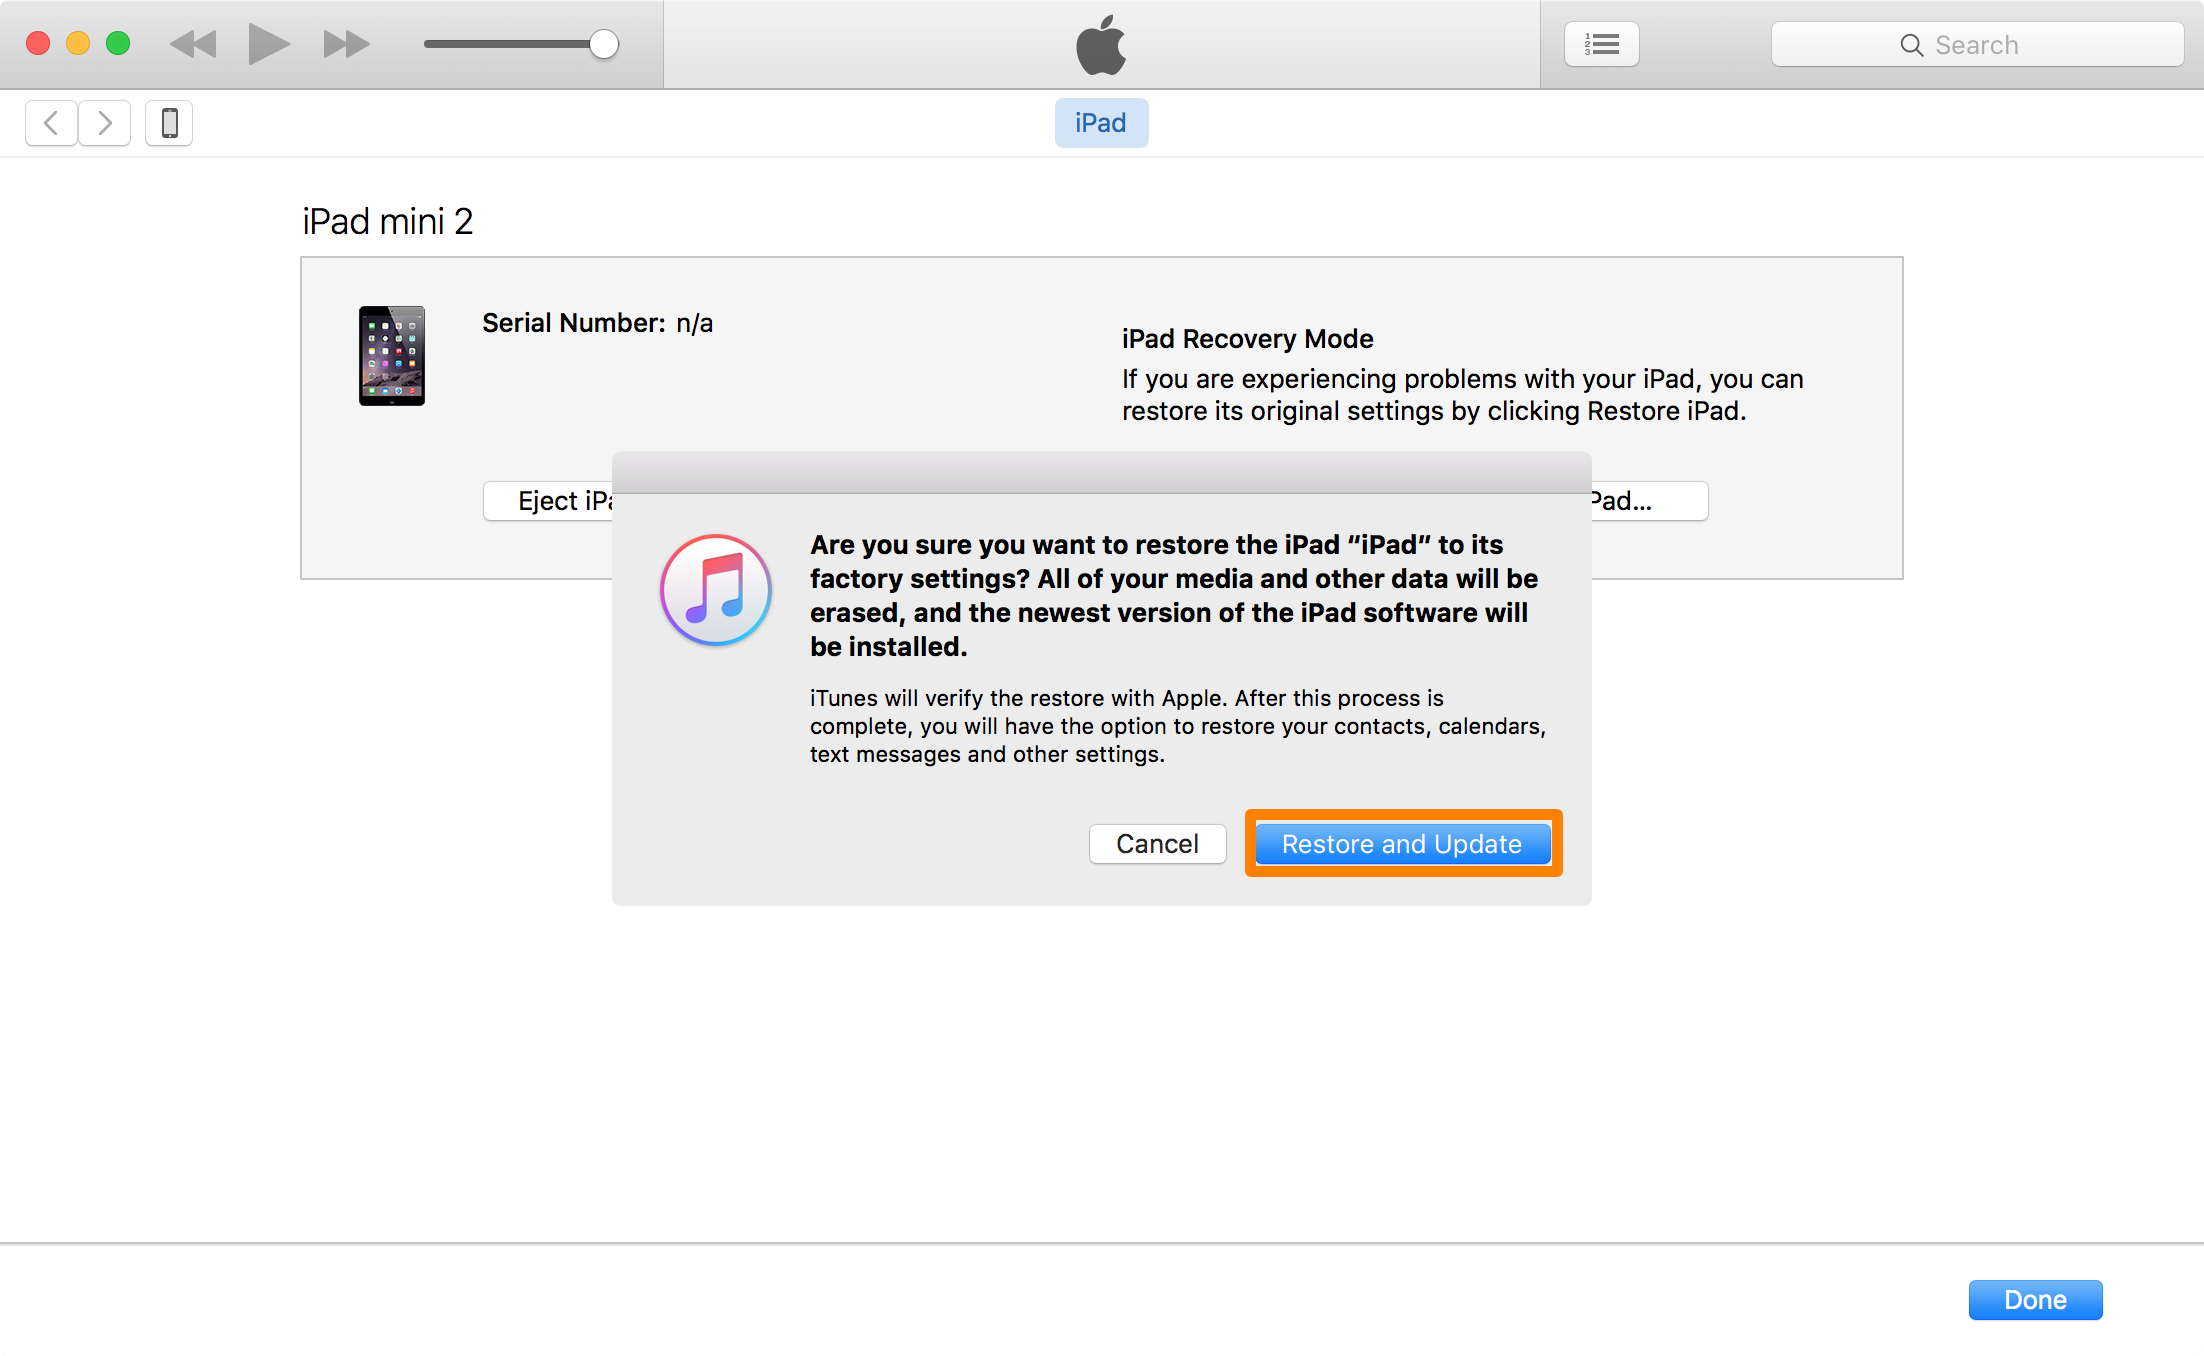
5) A prompt will now pop up, so click on the Restore and Update button.
iTunes Restore and Update
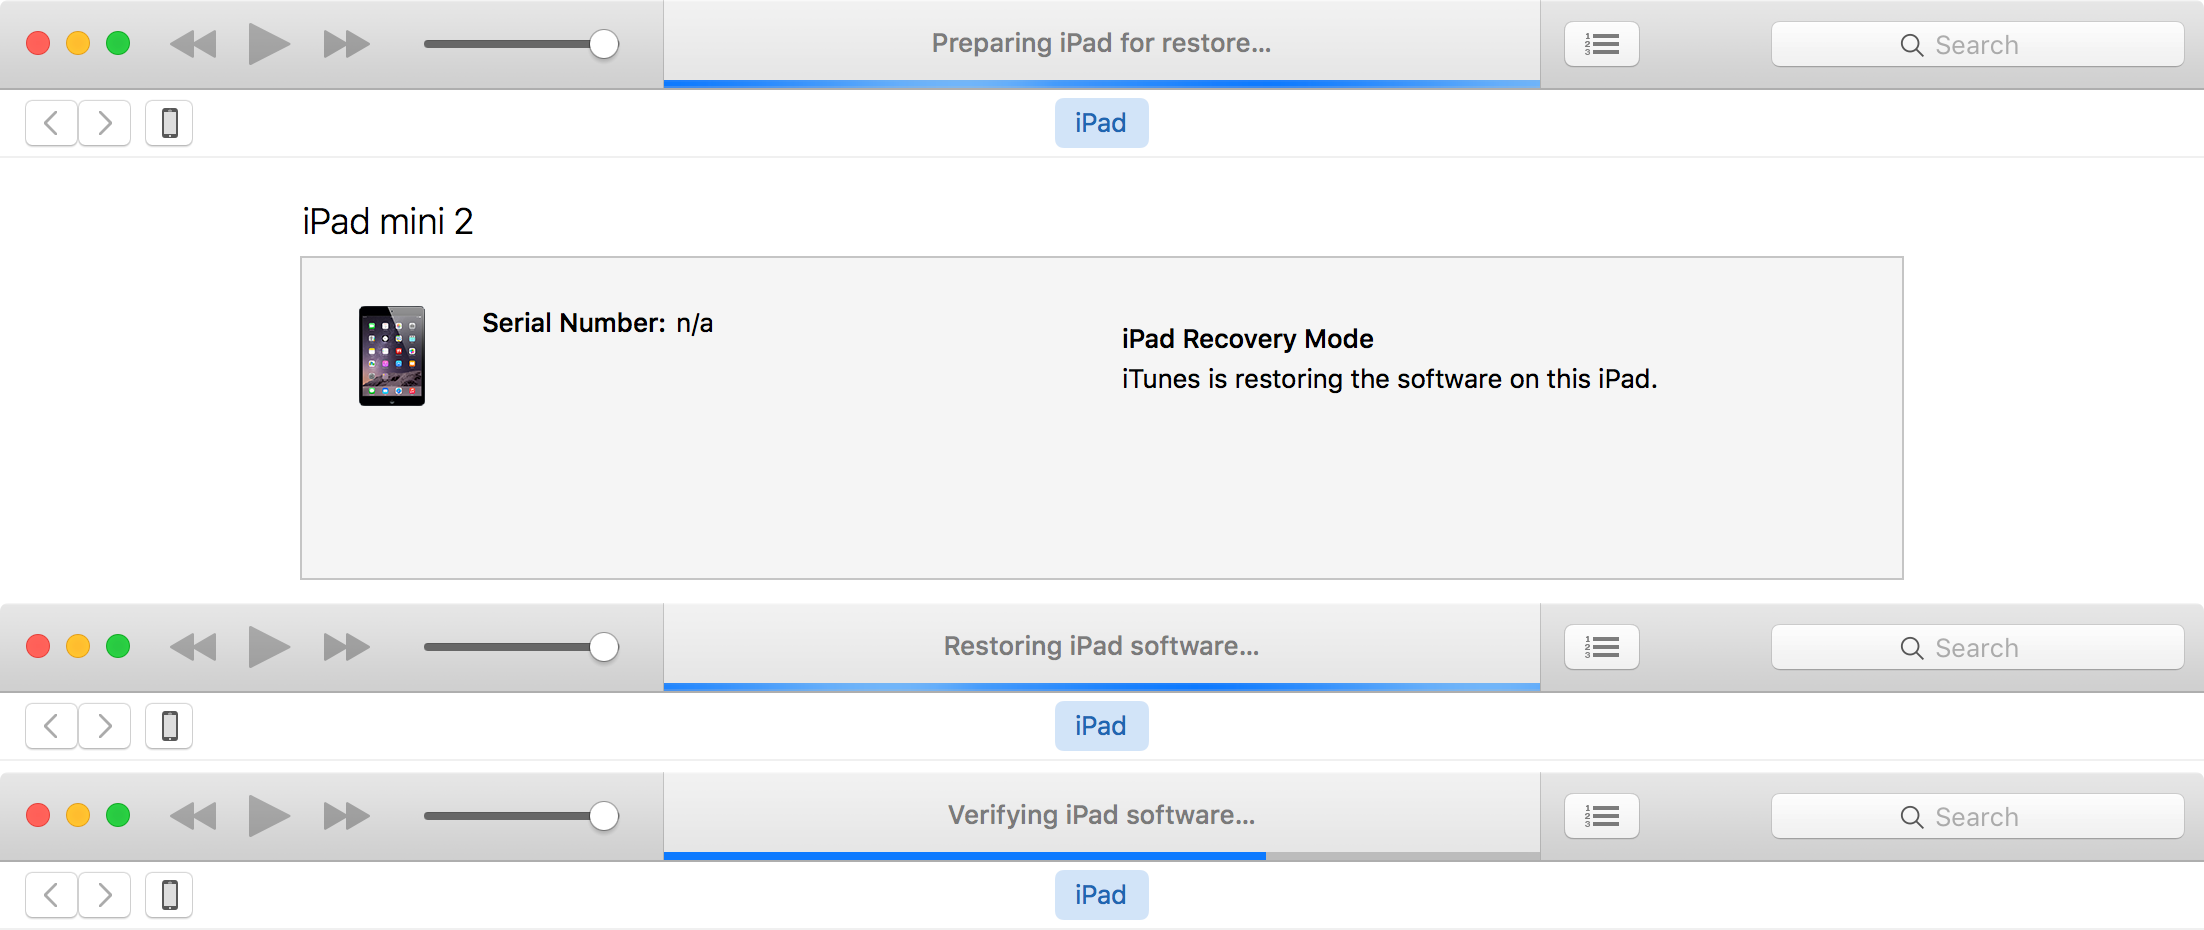
6) iTunes will now begin restoring your device. Do not disconnect it during this process:
iTunes Restore Process
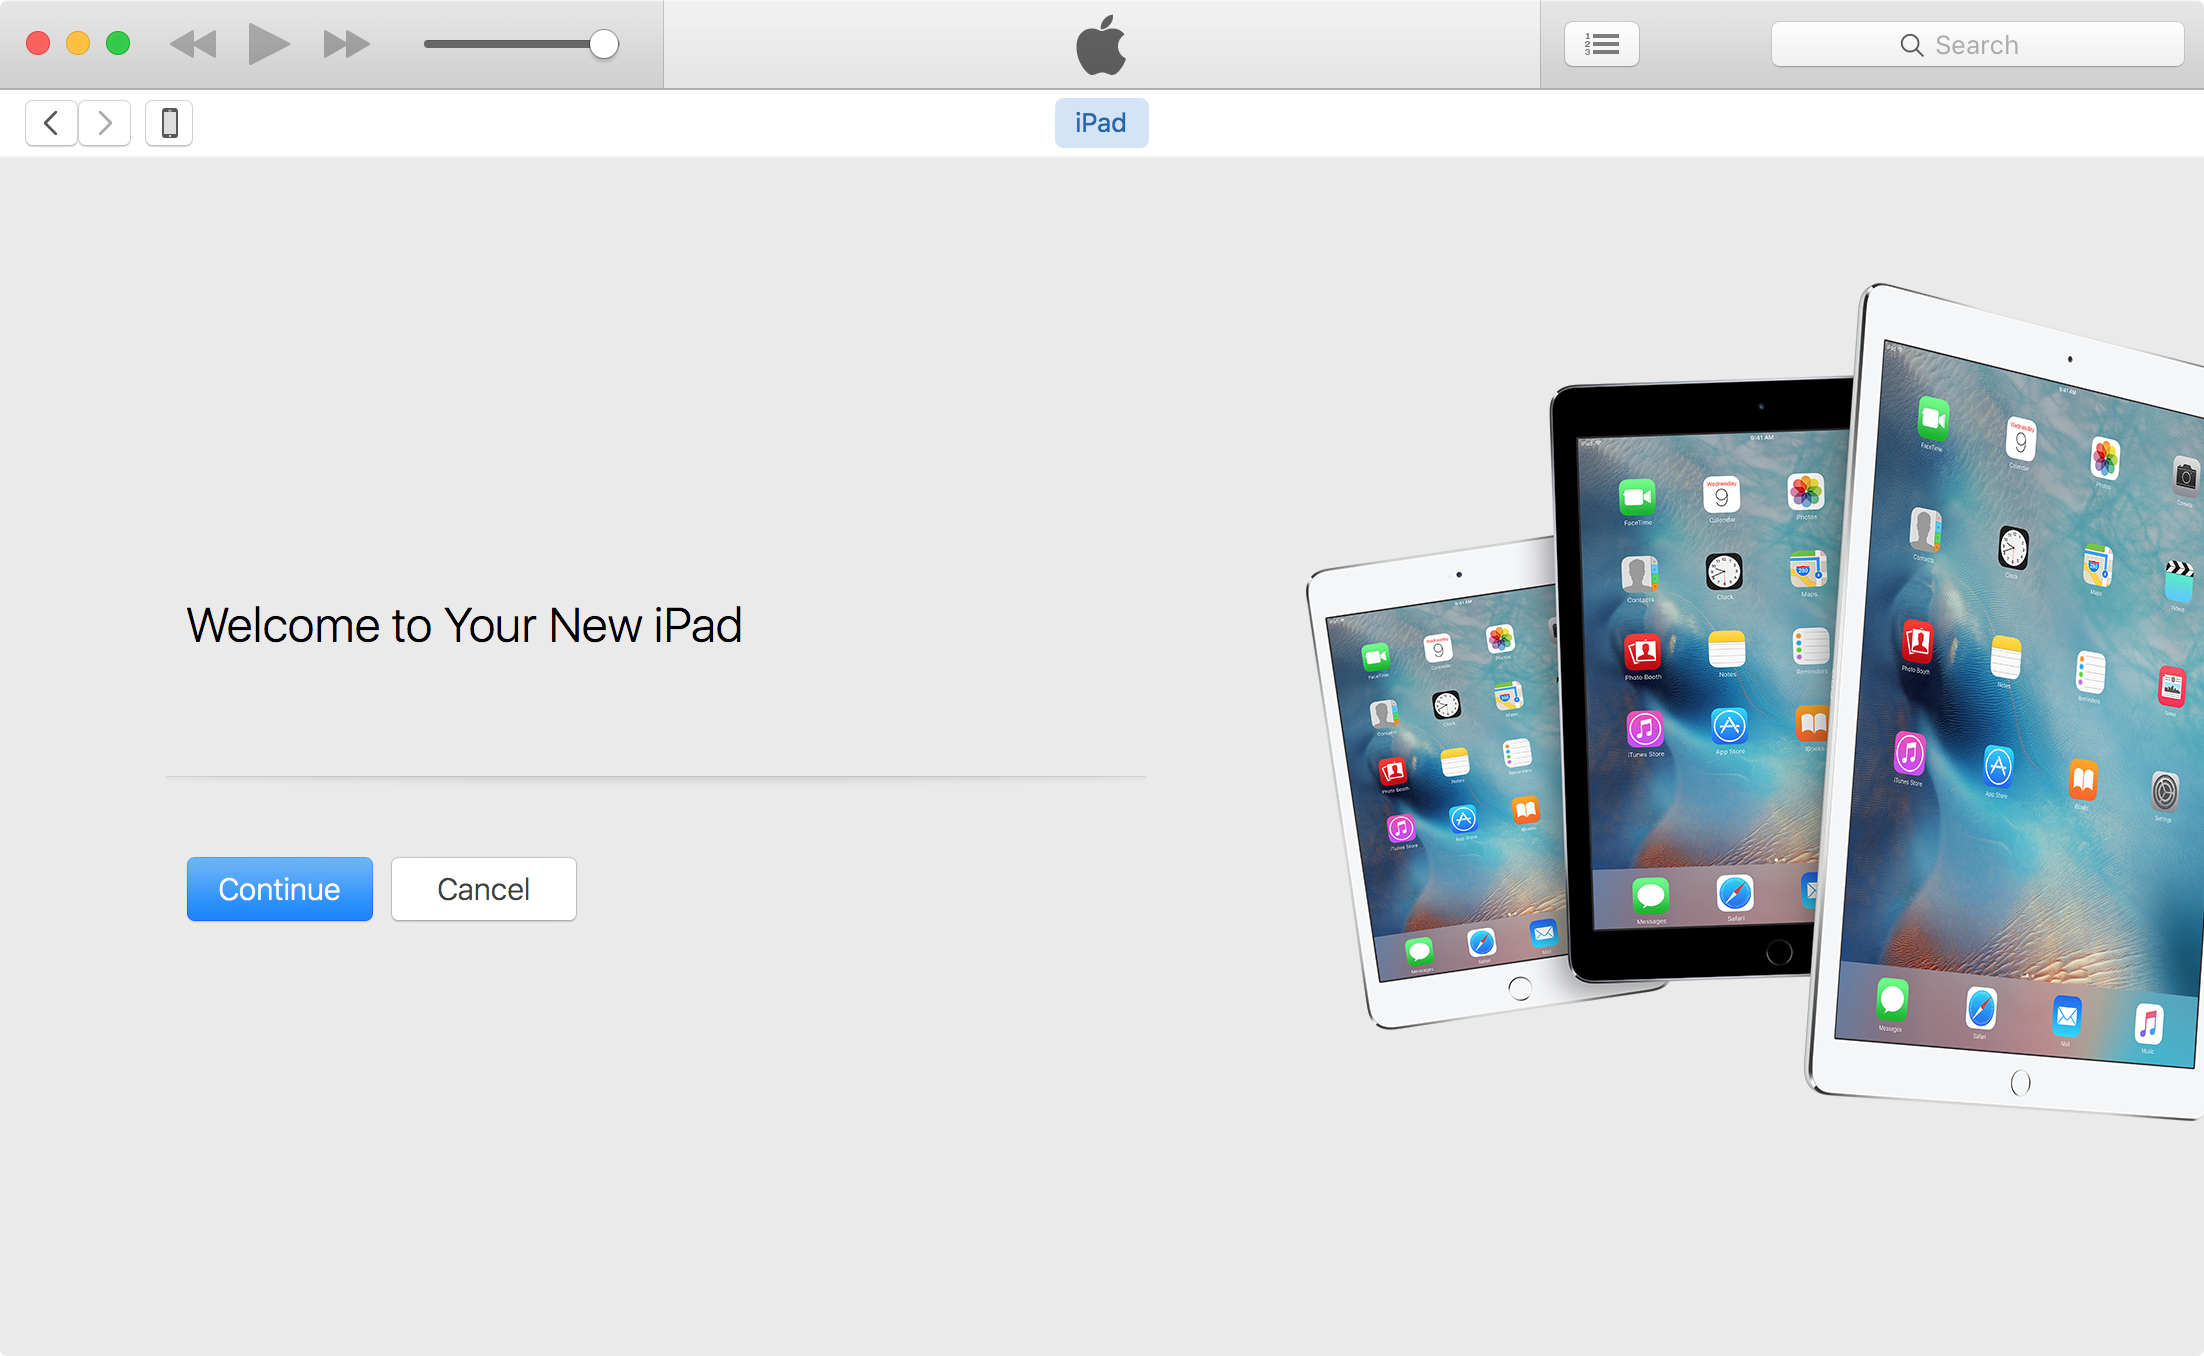
7) After everything is all done, you should see this screen:
iTunes app continue restore
Congratulations! Your device is now fully restored to a stock installation of iOS. Now follow the on-screen instructions on your iOS device, and you can either set your device up as new, or you can restore from the backup that you made before the jailbreak.

Wrapping up

Unfortunately, removing your jailbreak can’t be made any easier than restoring your device at this point in time. Nevertheless, your jailbreak is now removed and your device is stock once again.

Sunday, 1 January 2017

Iphone 7S phone feattures

hi all,
Apple, Apple iPhone 7, Apple iPhone 7 review, iPhone 7 review blog, iPhone 7 review price, iPhone 7 camera samples, iPhone 7 features, iPhone 7 specs, iPhone 7 India launch, iPhone 7 India price, mobiles, smartphones, technology, technology newsApple iPhone 7 review blog: Here’s what we think of the new phone.
Apple iPhone 7 is still a couple of weeks away for most Indians. However, that hasn’t prevented at least some people from bringing in the devices from other markets where the phone has been successfully launched.
We were fortunate enough to get our hands on one of these devices and will have it with us for a couple of days. We will use the opportunity to live with the new iPhone 7 and see how much of a better experience is it offering. I am currently using the Apple iPhone 6s Plus, and will try and compare the two phones in terms of camera, speed and performance.
Apple iPhone 7 Unboxing Video
Below, see the comparison between the new iPhone 7 and last year’s iPhone 6s Plus camera. Both have 12MP rear cameras, but the iPhone 7 uses an f/1.8 aperture which gives it better performance in low light. You can see this extra light clearly in the image below.

Wednesday, 21 December 2016

Difference between A,CNAME and Alias record

What is a CNAME record?

CNAME stands for Canonical Name. CNAME records can be used to alias one name to another.
For example, if you have a server where you keep all of your documents online, it might normally be accessed through docs.example.com. You may also want to access it through documents.example.com. One way to make this possible is to add a CNAME record that points documents.example.com to docs.example.com. When someone visits documents.example.comthey will see the exact same content as docs.example.com.
To use CNAME records, select CNAME from the Add Record drop down in the advanced editor. Then enter the hostname you would like to alias from and the fully-qualified domain name you would like to alias to. You may also enter @ in the Alias for field to represent the domain itself.
For example, if the domain were example.com and you wanted www.example.com to point to example.com you could put www in the name field and @ in the alias for field.


What is an ALIAS record?

An ALIAS record is a virtual record type that we created to provide CNAME-like behavior on apex domains.
For example, if your domain is example.com and you want it to point to a host name like myapp.herokuapp.com, then you cannot use a CNAME record, but you can use an ALIAS record. The ALIAS record will automatically resolve your domain to one or more A records at resolution time and thus resolvers see your domain simply as if it had A records.

How does it work?

The DNSimple name servers are currently based on an open source Erlang DNS server that we developed along with the help of others in the DNS community. The erl-dns server provides a mechanism for plugging in custom handlers (here is a sample custom handler) and we use that extension mechanism for providing an ALIAS handler. Each time a request hits the DNSimple name servers for either an A or AAAA record type the custom handler is invoked and attempts to resolve the ALIAS into its appropriate IPv4 or IPv6 address, respectively. It does this by asking a resolver to resolve the domain. At the moment we are running PowerDNS’s resolver running locally on each system for this purpose.
If the resolution succeeds then the handler extracts the A and AAAA records and returns them to the erl-dns server process, which then goes on its merry way. It also sticks the result in an in-memory cache (you’ll see why in a second).
If the resolution fails, for example due to a timeout, then the cached response is returned, if one exists. We have the request timeout set quite low (500 milliseconds) and we may even move it lower in the future. If there is no response in the cache then the request is retried again, up to a maximum number of retries. If the request ultimately fails then we return an empty result set.
To support secondary DNS servers, especially ones that connect to us and pull zones using AXFR, we must resolve the ALIAS in a different way. Currently we resolve it as part of the secondary DNS setup process initially and then run a scheduled job to update the ALIAS record at secondary name servers by resolving them again, removing the old records and writing the new records to our zone transfer database, and then finally sending a NOTIFY message to the appropriate secondary name servers.
The actual implementation is handled by a small Go application which our Rails application calls, either from within Rails execution or in an aynchrnonous job, to handle the resolution. The Go application currently calls to Google’s public resolvers to resolve the ALIAS record.
When creating an ALIAS record you will notice than additional TXT field is created, this field is optional and it can be used for debugging purposes.

What is an A record?

An A record maps a domain name to the IP address (IPv4) of the computer hosting the domain. Simply put, an A record is used to find the IP address of a computer connected to the internet from a name.
The A in A record stands for Address. Whenever you visit a web site, send an email, connect to Twitter or Facebook or do almost anything on the Internet, the address you enter is a series of words connected with dots.
For example, to access the DNSimple website you enter www.dnsimple.com. At our name server there is an A record that points to the IP address 208.93.64.253. This means that a request from your browser to www.dnsimple.com is directed to the server with IP address 208.93.64.253.
A Records are the simplest type of DNS records, yet one of the primary records used in DNS servers.
You can actually do quite a bit more with A records, including using multiple A records for the same domain in order to provide redundancy. Additionally, multiple names could point to the same address, in which case each would have its own A record pointing to the that same IP address.

Querying A records

You can use dig to determine the A record associated to a domain name. The result is contained in the ANSWER section and it contains the fully-qualified domain name (FQDN), the remaining time-to-live (TTL) and the IP address.
$ dig A api.dnsimple.com

; <<>> DiG 9.8.3-P1 <<>> A api.dnsimple.com
;; global options: +cmd
;; Got answer:
;; ->>HEADER<<- opcode: QUERY, status: NOERROR, id: 5792
;; flags: qr rd ra; QUERY: 1, ANSWER: 1, AUTHORITY: 0, ADDITIONAL: 0

;; QUESTION SECTION:
;api.dnsimple.com.  IN A

;; ANSWER SECTION:
api.dnsimple.com. 59 IN A 208.93.64.253

;; Query time: 80 msec
;; SERVER: 8.8.8.8#53(8.8.8.8)
;; WHEN: Sun Jul 31 22:21:31 2016
;; MSG SIZE  rcvd: 50

A record structure

In DNSimple we represent A record with the following information:
NameThe host name for the record, without the domain name. This is generally referred as “subdomain”. We automatically append the domain name.
TTLThe time-to-leave in seconds. This is the amount of time the record is allowed to be cached by a resolver.
AddressThe IPv4 address the A record points to.
A record in the DNSimple record editor

Managing A records

You can create, update and delete A records for your domain using the DNSimple record editor.

Tuesday, 20 December 2016

What is Desktop virtualization?

What is desktop virtualization? Its many things to many people.
  1. Virtual Desktop Infrastructure (VDI)
  2. Session Virtualization
  3. RemoteApp
In this post we will only cover what desktop virtualization is and what components, needs and challenges are addressed by desktop virtualization.
The Microsoft Virtual Academy has a great jumpstart session on VDI.  here is the overview recording.(see the link at the bottom of this post for the entire session)
VDI gives you the ability to store and offer full virtual machines (OS, Applications, Data…) on a server which may be accessed by multiple clients or devices.
Session Virtualization allows users to access entire desktops (remote desktops or “sessions”) running on servers in the datacenter. It’s Terminal Services on steroids.
RemoteApp allows you to deliver remote applications to users instead of full desktops. It enables a publishing process that allows apps on session or VDI hosts to be provided to users. It allows RemoteApps to run side by side with local apps and integrates with the Start menu to make it simple for users to find and launch RemoteApps.
In this post we’ll take a high level look at deploying VDI (full virtual machines) in Windows Server 2012. So let’s get going
1. Open Server Manager (ideally from the Server you want to host the Session Broker role), Click on Add Roles and Features , Select Remote Desktop Services Installation and Click Next
1
2. Select Deployment Type of Standard deployment
2

3. Select Virtual machine-based desktop Deployment and Click Next
3
4. Click Next on the Review of role Services screen
4
5. Specify which server to act as the RD Connection Broker Server and Click Next
5
6. Specify which server to act as the RD Web Access Server and Click Next
(In our example, we’re elected to host the RD Web Access role on the same host as the Session Broker role.)
6

7. Specify the RD Virtualization Host and Click Next
In our example we’re using the same host for all 3 roles.  The Hyper-V role will be installed if it isn’t already.
7
8. Confirm Selection and check mark on Restart Destination Server automatically if Required, Click Deploy
8
After completion of this process, you have successfully deployed VDI desktop virtualization to this box.  Now you need to configure the machine pool.  That’s next…
Virtual Desktop Collection
There are two types of virtual desktop collections available: personal and pooled. You have the option to let Remote Desktop Services automatically manage pooled virtual desktops in a collection, or you can manually manage them. We will concentrate on automatically managed pooled virtual desktop collections.
A managed pooled virtual desktop collection offers the following capabilities:
  • Automatically create pooled virtual desktops based on a virtual desktop template.
  • Automatically install security updates and applications based on a virtual desktop template.
  • Live migration with local caching.
  • User profile disk support. A user profile disk stores user profile information in a separate virtual hard disk so that user profile settings are persistent across pooled virtual desktops.
With either managed or unmanaged, the administrator can configure the pool to store the user profiles on User Profile disks separate from the machines.
Create a Pooled – Managed Virtual desktop Collection
1. Open Server Manager, Click Remote Desktop Services and Select Overview
pool-1
2. In Deployment Overview Section, Click Tasks and Select Edit Deployment properties.
pool-2
3. Expand Active Directory and Select the Organization Unit if you would like to add the Virtual desktops to the domain , Click Apply
pool-3
4. Select Collections tile
pool-4
5. In Collection Section, Click Tasks and Select Create Virtual Desktop Collection , Click Next
pool-5
6. Type the Name of the Collection and Click Next
pool-6
7. Select the Pooled Virtual desktop collection and Click Next
pool-7
8. Specify the Virtual Desktop Template which must be pre-configured in Hyper V (ensure that your template image is syspreped) and Click Next.
pool-8
9. Click Next
pool-9
10. Specify the unattended installation settings and Select the OU
pool-10
11. Specify the Users and Groups and Specify the Prefix and Suffix for the Virtual Desktop
pool-11
12. Specify Virtual Desktop allocation and Click Next
pool-12
13. Specify Virtual desktop storage and Click Next
pool-13
14. Specify User Profile disk if you want with the UNC Path and Click Next
pool-14
15. Confirm Selections and Click Create
pool-15
16. View Progress and Click Close
pool-16
17. In Collection Section, Right Click VDI( Collection Name) and Select Task Status details
pool-17