BEST DEAL

Monday, 2 January 2017

How to Jailbreak iOS 9 – iOS 9.0.2 using Pangu Jailbreak

How to Jailbreak iOS 9 – iOS 9.0.2 using Pangu Jailbreak


Pangu team just surprised us by releasing Pangu jailbreak for iOS 9 – iOS 9.0.2, the first jailbreak for iOS 9 and also for iPhone 6s, iPhone 6s Plus. Here’s how to jailbreak your device running on iOS 9, iOS 9 or iOS 9.0.2 using Pangu jailbreak.
Some important points before you proceed:
  • Pangu9 jailbreak tool can jailbreak iOS 9, iOS 9.0.1, iOS 9.0.2.
  • Pangu supports following iOS 9 – iOS 9.0.2 devices:
    • iPhone 6s, iPhone 6s Plus, iPhone 6, iPhone 6 Plus, iPhone 5s, iPhone 5c, iPhone 5, iPhone 4S
    • iPad Air 2, iPad Air, iPad 4, iPad 3, iPad 2
    • iPad mini 4, iPad mini 3, iPad mini 2, iPad mini
    • iPod touch 6G, iPod touch 5G
  • Pangu 9 is an untethered jailbreak.
  • Pangu 9 is a free jailbreak tool.
  • You need a computer (Mac or Windows PC) to use the Pangu Jailbreak. Mac users can check our guide on how to jailbreak iOS 9 – iOS 9.0.2 using Pangu Jailbreak for Windows.
  • Use iCloud or iTunes to back up any and all personal information that you need to keep safe. The jailbreak has been reported to be working in most cases, but on the off chance something goes wrong, it’s a good idea to have an escape plan.
  • Disable any Anti-virus programs or firewalls that could prevent Pangu from connecting to the internet.
  • If you’re on the fence and not sure if you should jailbreak your device, then check our post on some of the tops reasons to jailbreak iOS 9 – iOS 9.0.2.

How to Jailbreak iPhone, iPad and iPod touch on iOS 9 – iOS 9.0.2 using Pangu Jailbreak

Follow these steps to jailbreak your iPhone, iPad and iPod touch on iOS 9 – iOS 9.0.2 using Pangu jailbreak.
Step 1: Download the latest version of the Pangu jailbreak our Download Pangu Jailbreak page. Pangu jailbreak is a free jailbreak tool. It should not prompt you to enter a registration code.
Step 2: Connect your device to your computer using the USB cable.
Step 3: Take a backup of your device using the latest version of iTunes. After you’ve taken the backup, close iTunes. Also close Xcode if you’ve it open.
Step 4: Disable Passcode from Settings > Touch ID & Passcode, turn off Find my iPhone from Settings > iCloud > Find my iPhone, and enable Airplane mode.
Step 5: Please launch the Pangu 9 application that you had downloaded in step 1 as an Administrator. Right Click on the Pangu exe and select the “Run as Administrator” option.
Step 6: Pangu will take some time to detect your device. Once that is done, click on the blue Start button.
Pangu iOS 9 Jailbreak - Start
Step 7: Click on Already Backup button to proceed to the jailbreak.
Pangu iOS 9 Jailbreak - Already Backup
Step 7: At 55%, it will reboot your device.
Step 8: At 65%, it will prompt you to enable AirPlane mode again after your device has rebooted.
Step 9: At 75%, it will then prompt you to unlock your device, and run the Pangu app. Launch the Pangu app from the Home screen. If you can’t find the app the try searching your device for “Pangu”. It also installs the WWDC app but you can ignore it. The Pangu and the WWDC app will be removed when your device is successfully jailbroken.
Pangu iOS 9 Jailbreak - Run Pangu app
Step 10: Next, it will prompt you to tap on the Accept button, to give access to the Photos app. Next tap on Allow when you get a popup on your device. It is not clear why it needs access to the Photos app, we’ll update the post when we get more information.
Pangu iOS 9 Jailbreak - Access Photos
Step 11: Wait for the progress bar to complete. Your iPhone or iPad will reboot.
Step 12: Once the process completes, the Pangu tool will tell you that your device is “Already Jailbroken”. You should see the Cydia icon on your home screen. Please don’t forget to disable AirPlane mode before launching Cydia. Cydia will take some time “Preparing filesystem” when you launch it for the first time. It will exit after it is done, and respring your device.
iPhone - iOS 9 Jailbreak

How to remove the iOS 9.3.3 jailbreak from your device

How to remove the iOS 9.3.3 jailbreak from your device


Delete Cydia
The iOS 9.2-9.3.3 jailbreak debuted over the weekend, and soon after, jailbreak developers managed to make a Safari web browser-based jailbreak that doesn’t even require you to hook up to a computer to jailbreak iOS 9.3.3.
Of course, it’s a semi-untethered jailbreak, and there are a lot of caveats to it, so if you’re having jailbreaker’s remorse and you want to know how to put your device back to a stock device, don’t fret because we’re going to talk about that in this tutorial.

Removing the jailbreak from your device

Unfortunately, Cydia Impactor, which is now known as Cydia Eraser, does not support iOS 9.3.3. This means you can’t use it to remove Cydia and all traces of jailbreak from your device like you were previously able to.
If you don’t want the jailbreak that you’ve installed on your device anymore, then you will have to restore your device through iTunes. Hopefully you followed the recommended procedure before jailbreaking, and backed your device up before jailbreaking.
We know this isn’t what you wanted to hear, but this is the only way to un-jailbreak your device at this point in time.
To do this, you’ll follow these steps:
1) Plug your iPhone, iPod touch, or iPad into your Mac or PC with a Lightning cable.
2) Next, put your device into Recovery Mode. To do that, you can follow our write-up for entering Recovery Mode, and then move on to the next step.
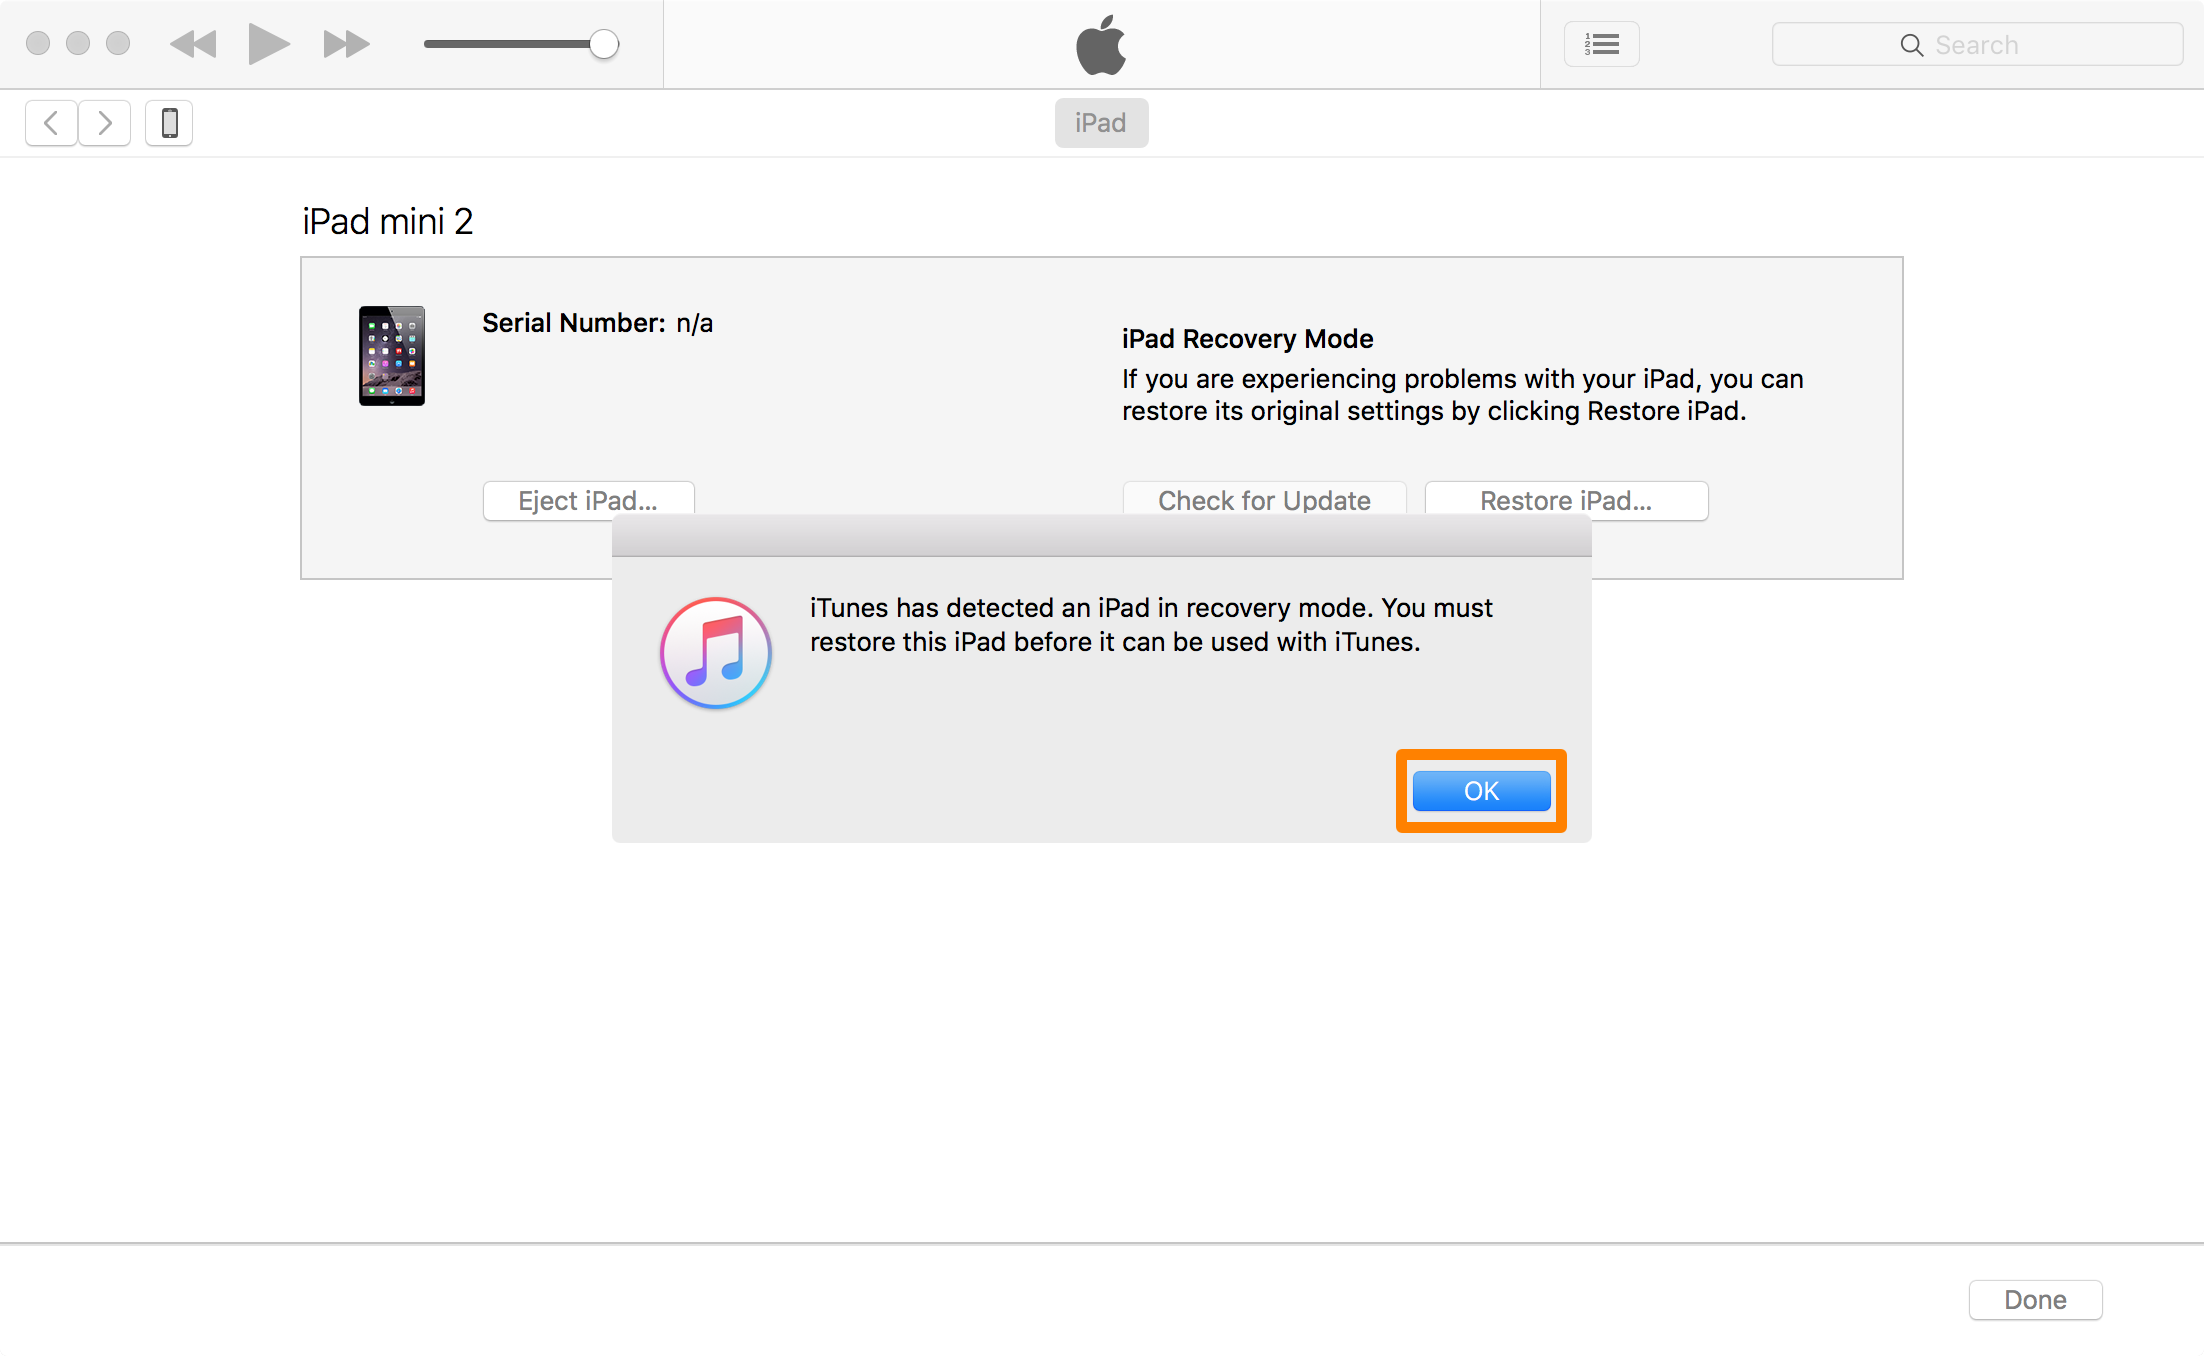
3) Launch iTunes on your Mac or PC, and you should then see a prompt from within the app. Click on the OK button.
iTunes OK Restore Recovery Mode
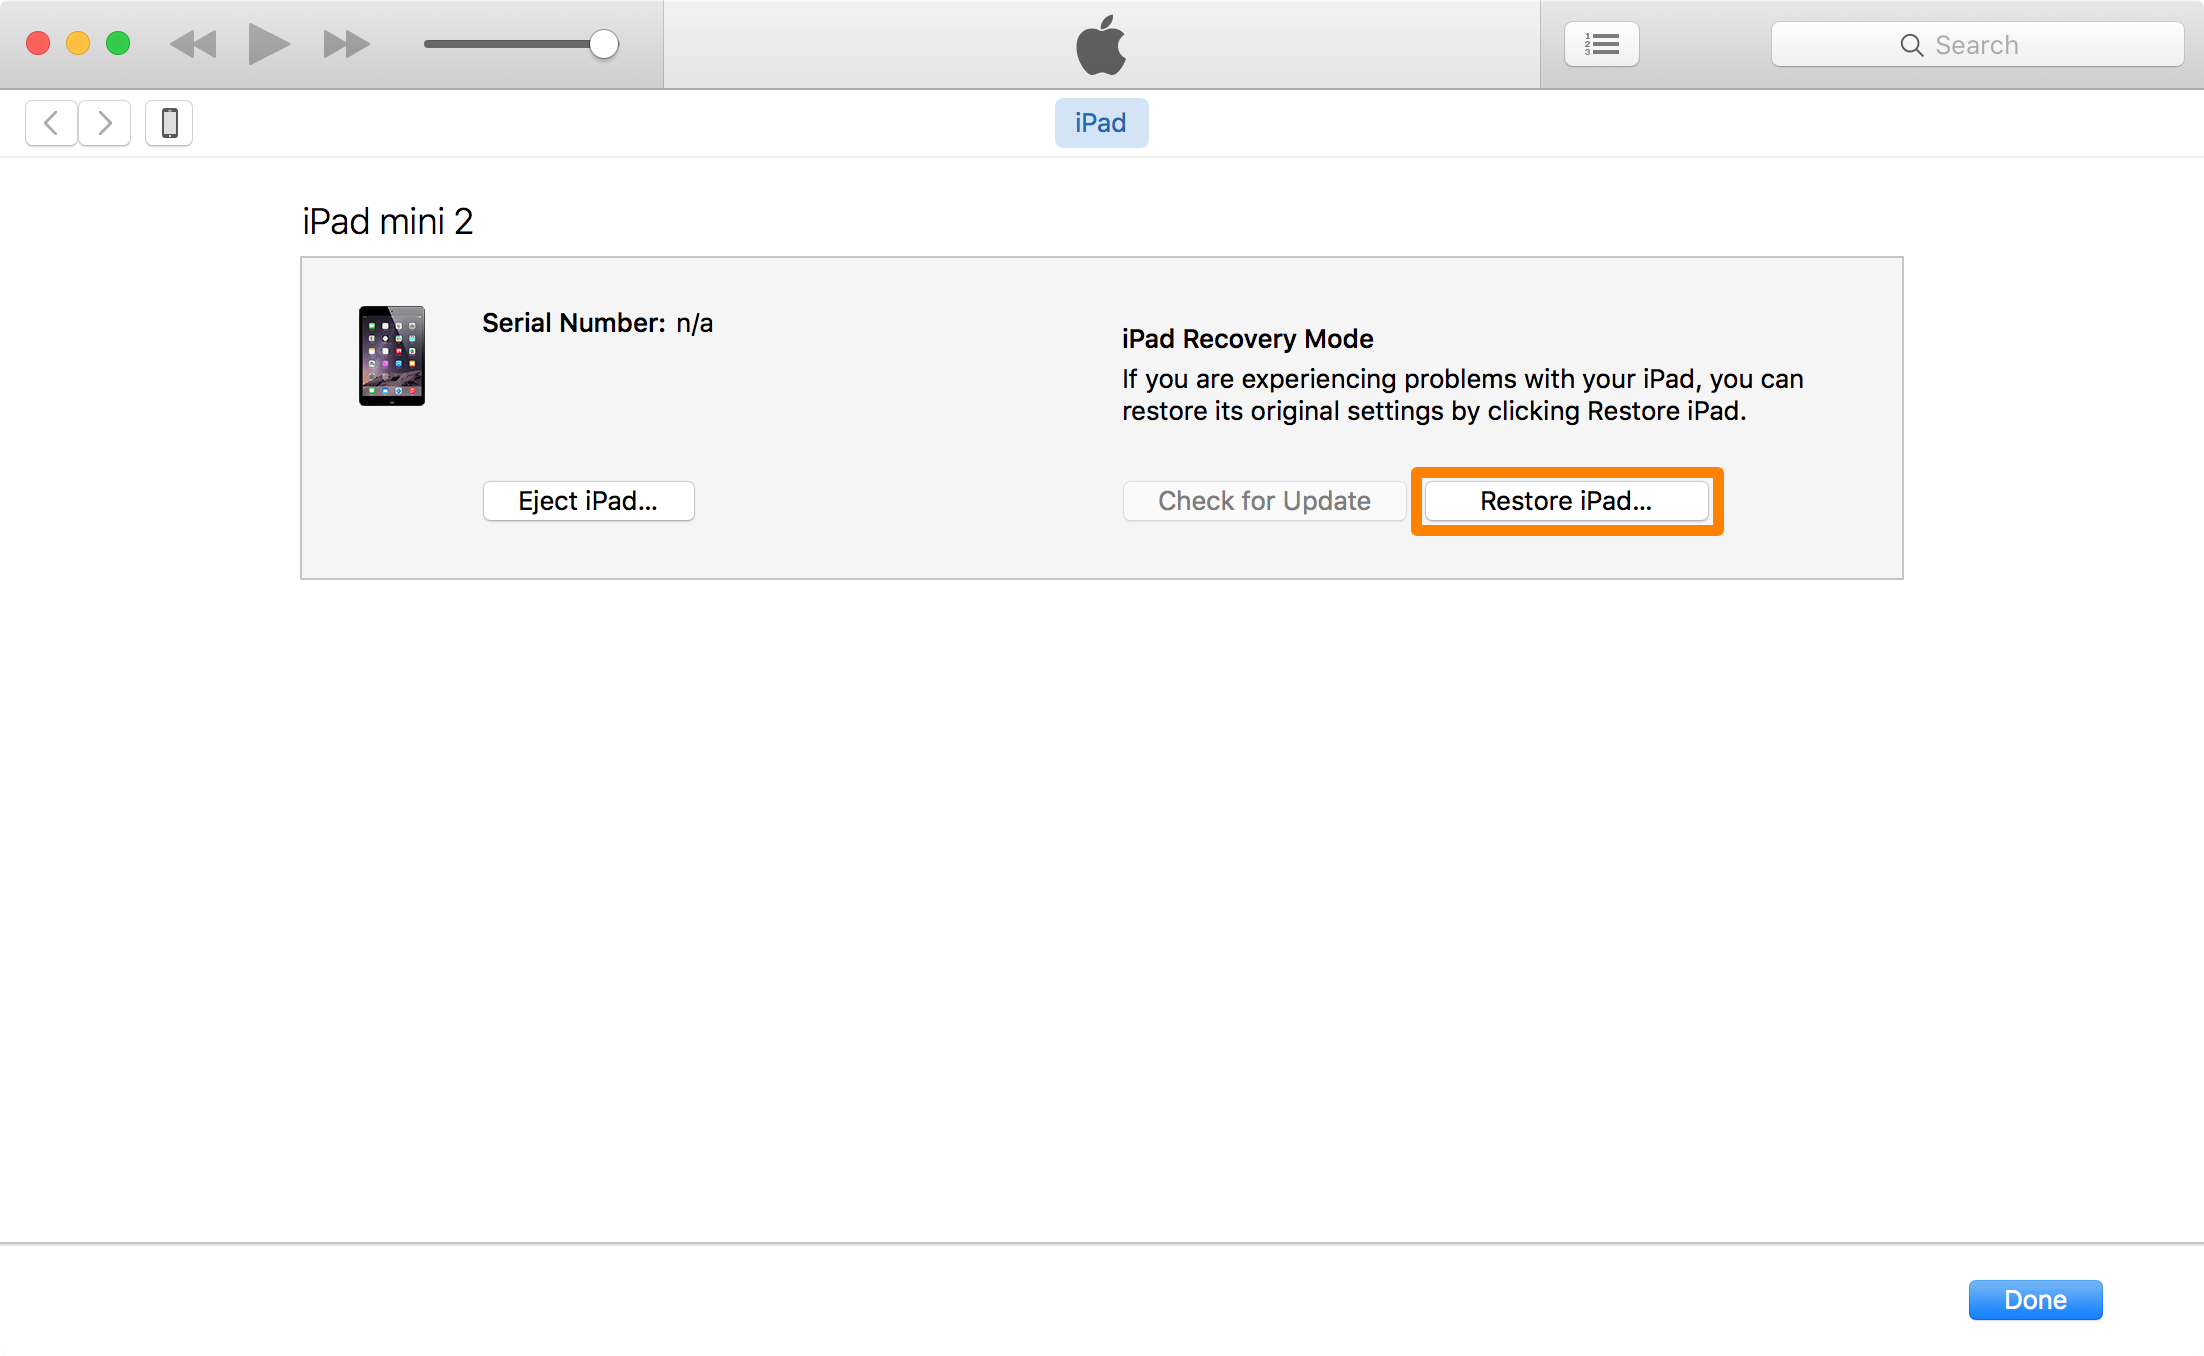
4) Next, click on the Restore button:
Restore iPad Prompt iTunes
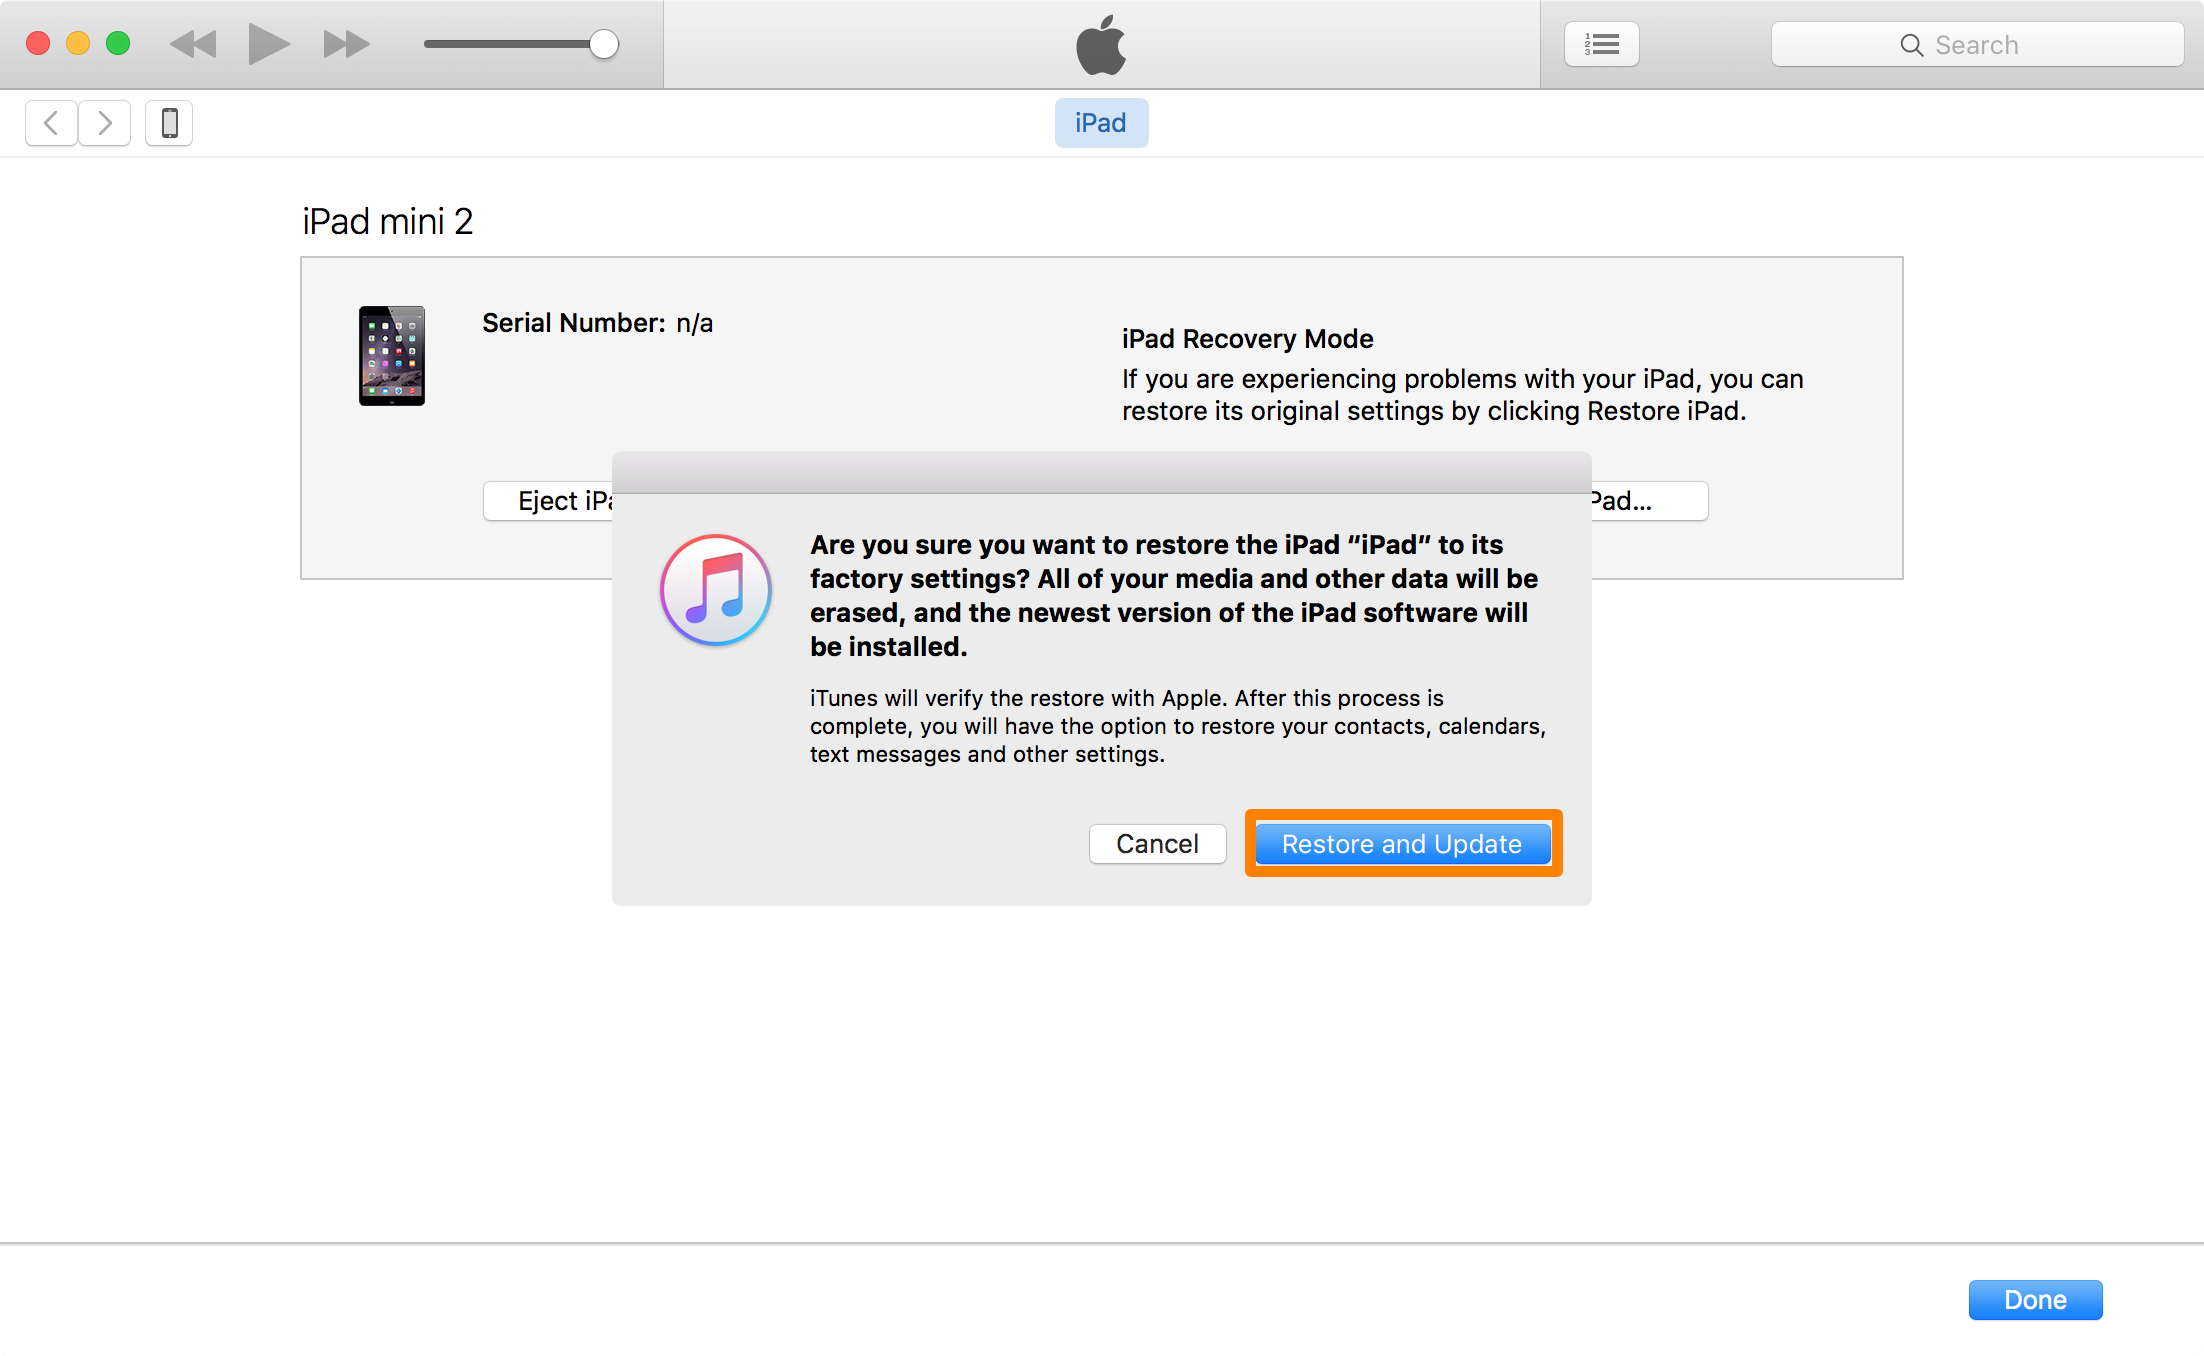
5) A prompt will now pop up, so click on the Restore and Update button.
iTunes Restore and Update
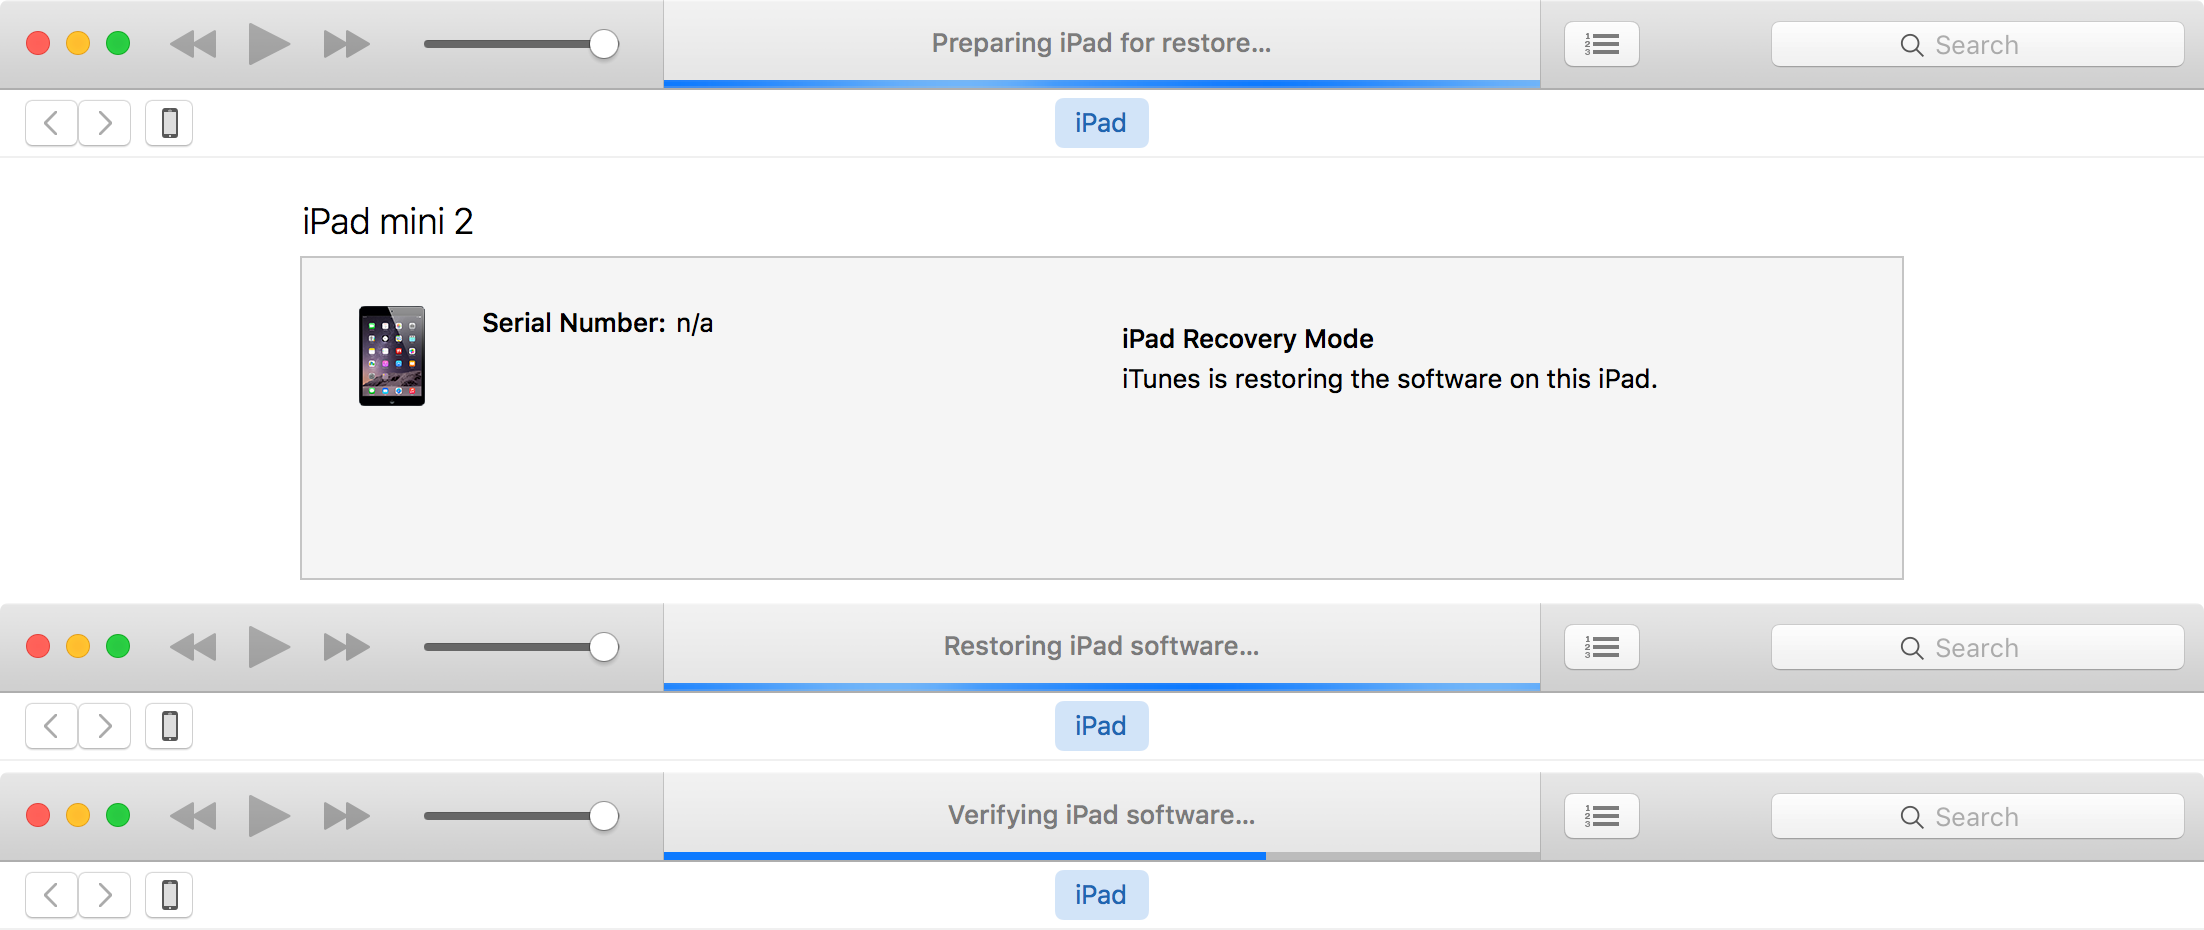
6) iTunes will now begin restoring your device. Do not disconnect it during this process:
iTunes Restore Process
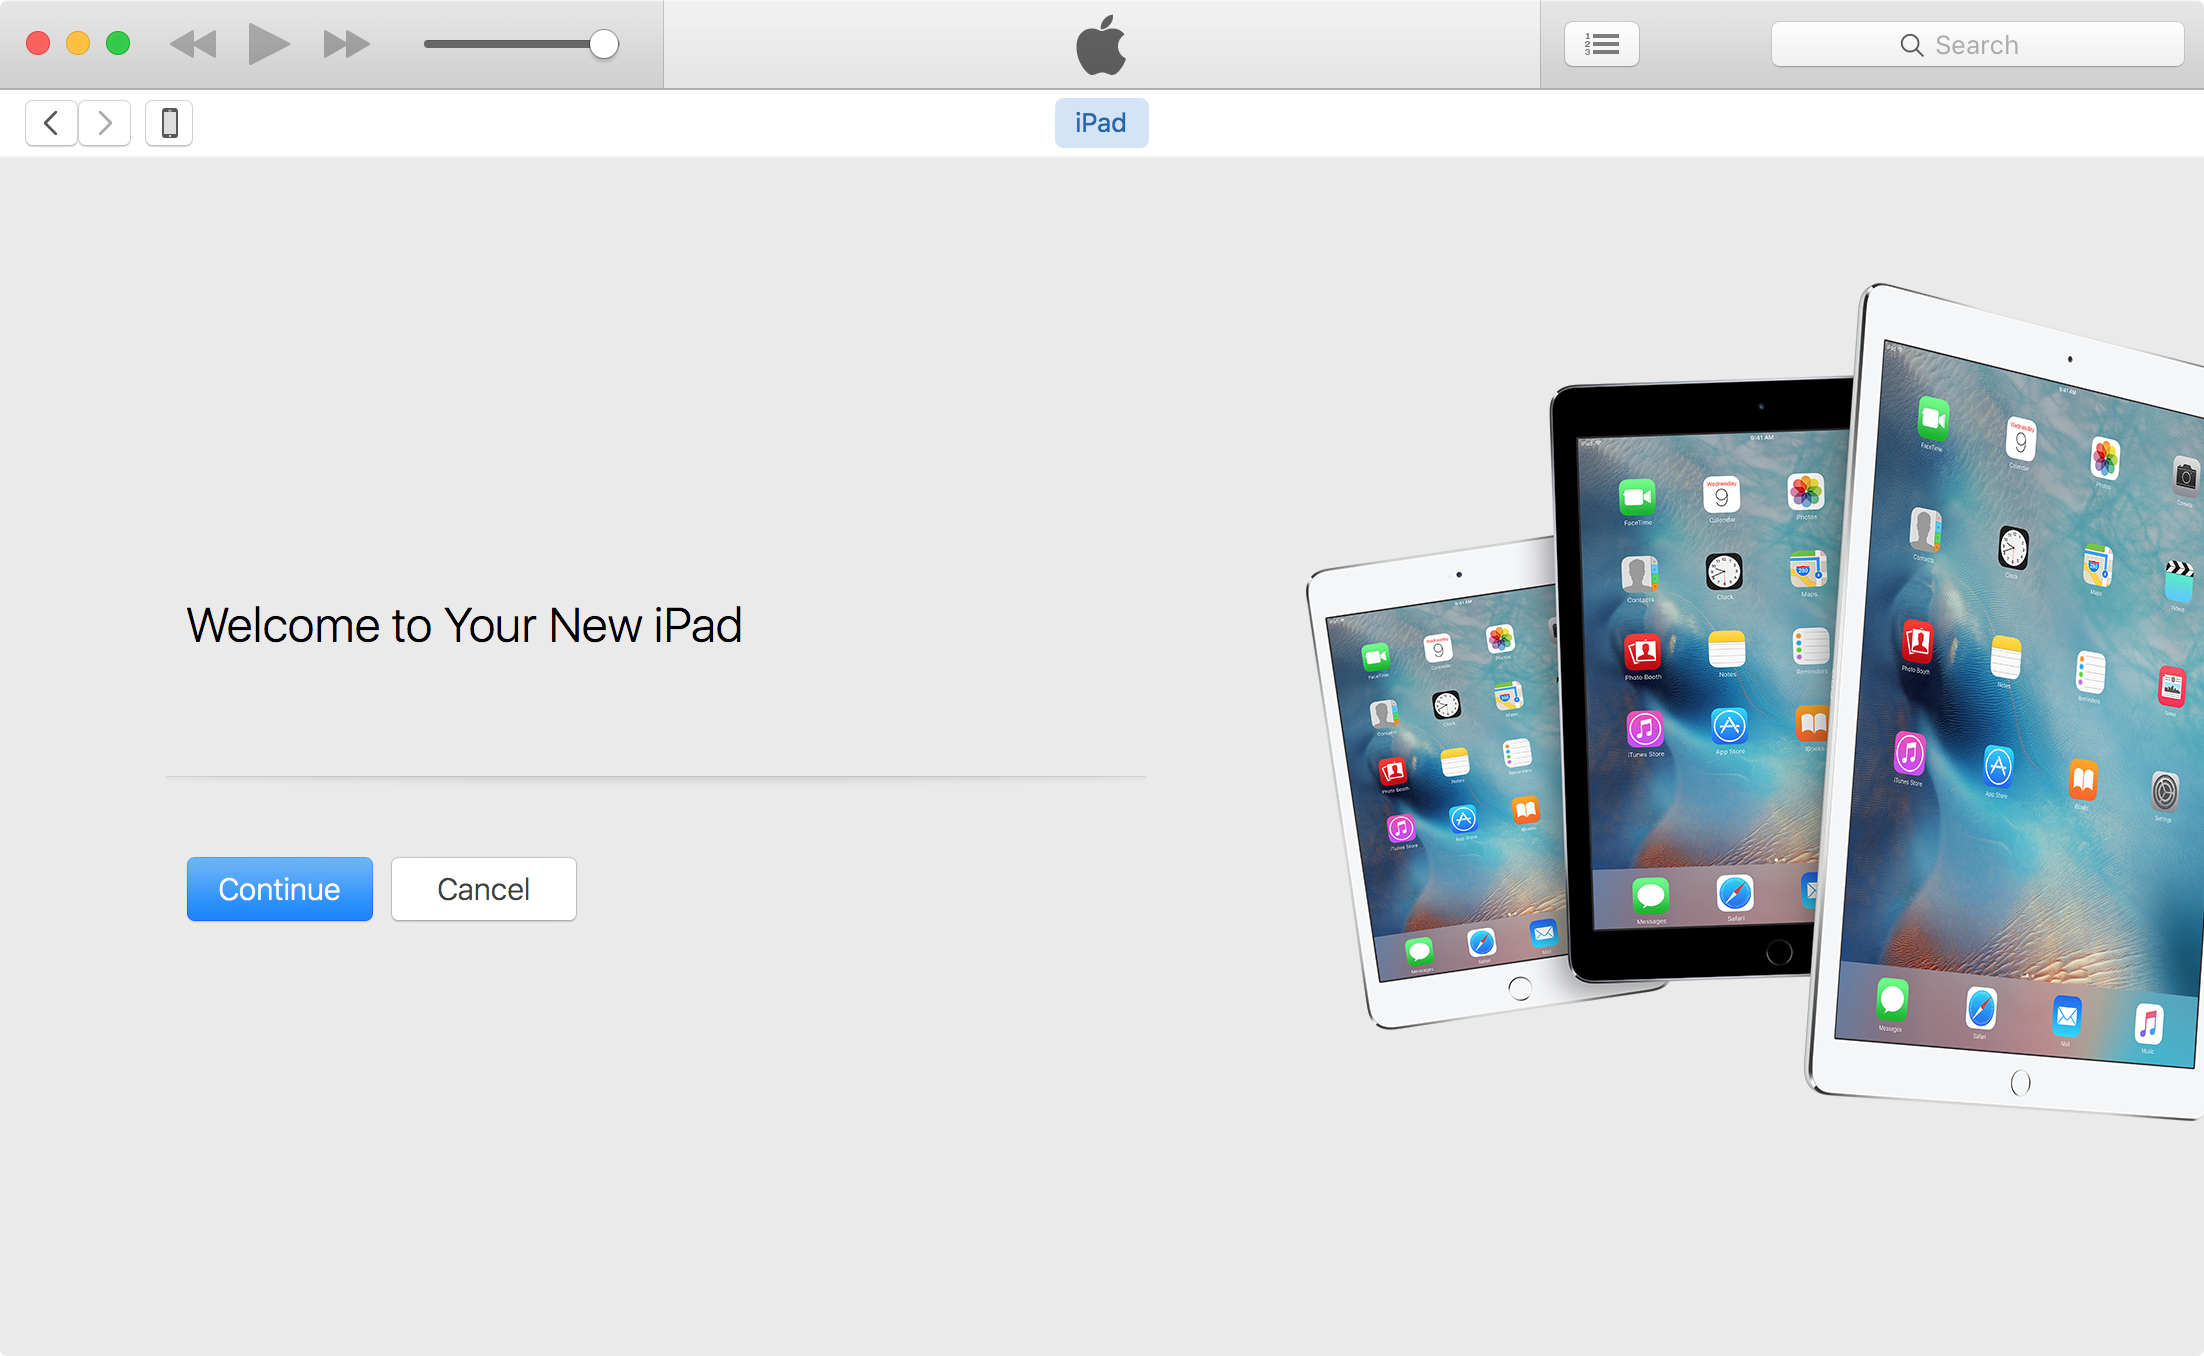
7) After everything is all done, you should see this screen:
iTunes app continue restore
Congratulations! Your device is now fully restored to a stock installation of iOS. Now follow the on-screen instructions on your iOS device, and you can either set your device up as new, or you can restore from the backup that you made before the jailbreak.

Wrapping up

Unfortunately, removing your jailbreak can’t be made any easier than restoring your device at this point in time. Nevertheless, your jailbreak is now removed and your device is stock once again.

Sunday, 1 January 2017

Best TOP5 phone in january 2017


Iphone 7S phone feattures

hi all,
Apple, Apple iPhone 7, Apple iPhone 7 review, iPhone 7 review blog, iPhone 7 review price, iPhone 7 camera samples, iPhone 7 features, iPhone 7 specs, iPhone 7 India launch, iPhone 7 India price, mobiles, smartphones, technology, technology newsApple iPhone 7 review blog: Here’s what we think of the new phone.
Apple iPhone 7 is still a couple of weeks away for most Indians. However, that hasn’t prevented at least some people from bringing in the devices from other markets where the phone has been successfully launched.
We were fortunate enough to get our hands on one of these devices and will have it with us for a couple of days. We will use the opportunity to live with the new iPhone 7 and see how much of a better experience is it offering. I am currently using the Apple iPhone 6s Plus, and will try and compare the two phones in terms of camera, speed and performance.
Apple iPhone 7 Unboxing Video
Below, see the comparison between the new iPhone 7 and last year’s iPhone 6s Plus camera. Both have 12MP rear cameras, but the iPhone 7 uses an f/1.8 aperture which gives it better performance in low light. You can see this extra light clearly in the image below.